Kubernetes - Container orchestration
Introduction
Kubernetes (or K8s) is an open-source system used for container orchestration. Indeed, it complements container applications such as Docker. It permits the consistent deployment and management of containers. Kubernetes was developed by Google and later donated to the Cloud Native Computing Foundation. The first version was released in July 2015.
Compatibility
At the beginning, Kubernetes was only compatible with Docker. Over time, Kubernetes became able to work with other container applications such as rkt. To accomplish this, they introduced an interface called the Container Runtime Interface (CRI). It allows any application to work with any container application as long as they adhere to the Open Container Initiative (OCI) standards.
The Open Container Initiative (OCI) consists of an imagespec and a runtimespec :
- imagespec : It defines the specifications on how an image should be built.
- runtimespec : It defines the standards for how any container runtime should be developed.
However, Docker is not compatible with Container Runetime Interface because he has been developed before the Open Container Initative standars. So, Kubernetes had to adapted their application for the CRI and Docker as well. To be able to support, they have set up dockershim.
A few years later, after an update, Kubernetes stopped support dockershim, and Docker was not supported anymore by Kubernetes for the runtime, but only for the imagespec because it followed the standard of OCI. Nowadays, a group of developers has created cri-dockerd, a runtime that is compatible with Kubernetes.
Architecture
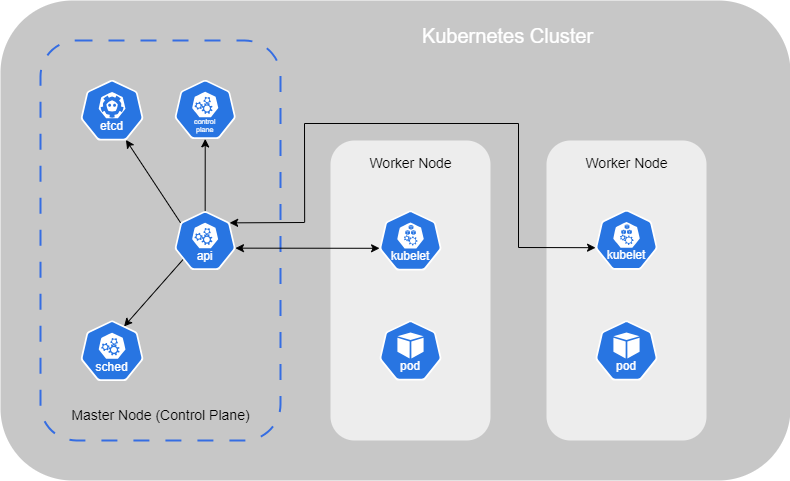
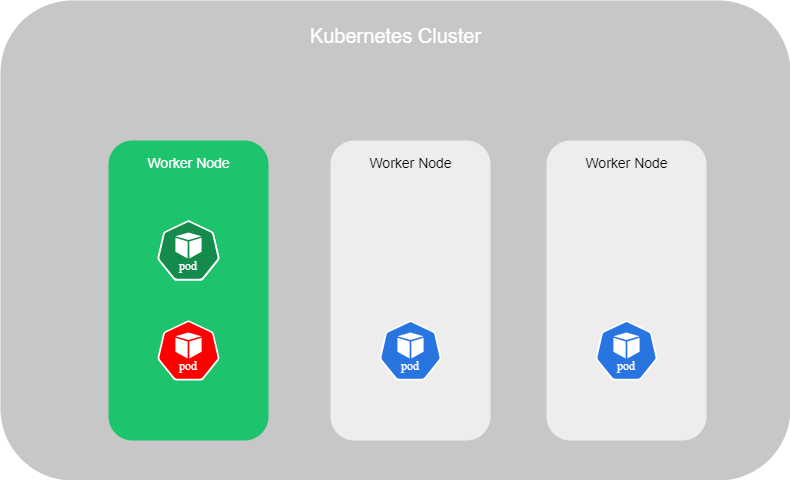
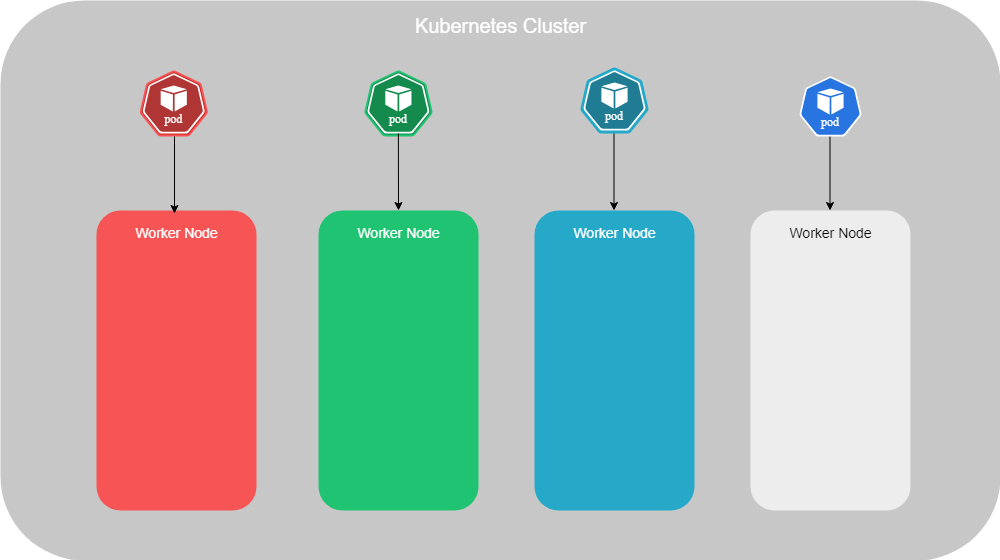
The first thing we find in the architecture of container orchestration is the Worker Node (prevously named Minions). A Worker Node can be a physical or virtual machine where containers are run by Kubernetes.
You should have multiple Worker Nodes to use Kubernetes properly. Indeed, if one Worker Node fails, the others are still available to take over and keep the application running. This setup is called a cluster.
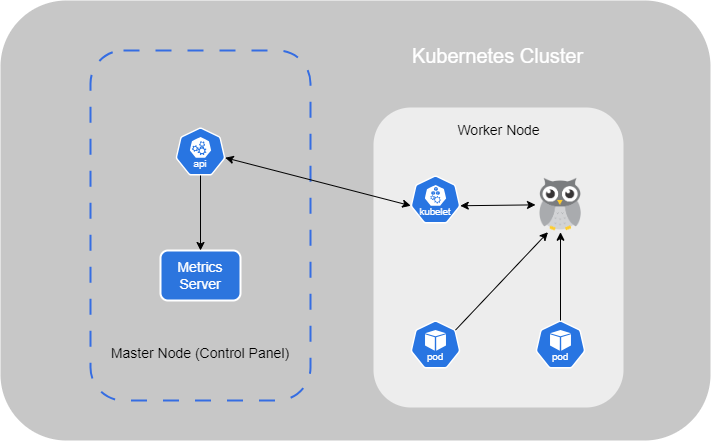
The Master Node should be set up to move the workload and watches over the Worker Nodes in the cluster and is responsible for container orchestration.
Kubernetes Master and Worker Node is composed of multiple components that are automatically installed when you set up it on your system :
- API Server : This acts as the front end for Kubernetes, managing and interacting with Nodes in the cluster ;
- Scheduler : It is responsible for distributing the workload and containers across the multiple Worker Nodes in the cluster. When a new container is created, it automatically assigns it to a Node.
- Controller : It acts as the brain of this orchestration. Indeed, it notices and responds when Worker Nodes or containers go down. It makes decisions about when new containers need to be brought up.
- etcd : It is a key-value store that holds all the information about the Worker Nodes and Masters in the cluster ;
- Pod : This is explained in another section ;
- Kubelet : It is the agent running on each Worker Node in the cluster. It ensures that the containers are running as expected on the Node.
In this setup, the Node having the Kube-apiserver is designated as the cluster Master. Other Worker Nodes, with the Kubelet agent, communicate with the master to share data and execute tasks upon request.
Tools and Distributions
This section will be completed soon
- Kubectl : Kubectl is the command-line interface used to interact with a Kubernetes cluster. It allows users to create, modify, retrieve information about, or delete resources.
- Kubeadm : Kubeadm is a tool designed to simplify the installation and configuration of a Kubernetes cluster. It allows you to designate which machines will function as the Master Node and which will serve as Worker Nodes
- Minikube : similar to Kubeadm but is intended for small-scale configurations. For example, if you want to run both the Master and the Worker on the same machine, Minikube is the appropriate tool to use.
- K3s
Debugging Containers Tool (circtl)
Kubernetes has its own command line tool named crictl, which is used to interact with container runtimes.
It is not used for deploying or managing but more for debugging container runtimes. Indeed, it works across different runtimes that are CRI compatible. The commands are quite similar to Docker.
- To pull an image, run the following command :
marijan$ crictl pull [IMAGE]
- To list existing images, execute :
marijan$ crictl images
- To get existing containers, run :
marijan$ crictl ps -a
- To execute a command inside a container, run :
marijan$ crictl exec -i -t [CONTAINER ID] [CMD]
- To view the logs :
marijan$ crictl logs [CONTAINER ID]
- To list pods :
marijan$ crictl pods
- To get low-level information on a container, image, or task, you can run the following command:
marijan$ crictl inspect [CONTAINER ID]
- To display a live stream of containers resource usage statistics, run:
marijan$ crictl stats [CONTAINER ID]
- To show the runtime version information :
marijan$ crictl version
Vanilla Cluster Deployment (Linux)
In this section, I'll detail the deployment of my Kubernetes Cluster on a system Linux, including all the information regarding the tools and resources employed.
Prerequisites
Before setting up a Kubernetes cluster, several prerequisites must be done :
- Machines : If want to use Kubeadm, a minimum of two machines is necessary. Alternatively, Minikube can be used for single-machine setups.
- Operating system : The machines must run on an up-to-date operating system to ensure compatibility and security.
- Resources : Each machine should have at least 2 GB of RAM and 2 CPUs allocated to handle Kubernetes workloads effectively.
- Network connectivity : The machines must be able to communicate easily with each other to enable cluster communication and coordination.
In my setup, I've established two virtual machines running on Debian 11. To manage networking, I've implemented a firewall with configured rules to facilitate communication and provide access to these machines.
Installation
The installation process is the same for the Master and the Node machines.
Container Runtime (cri-dockerd)
Firstly, to run containers within Pods, you need a container runtime compatible with CRI. In our case, we'll use Docker Engine as the container runtime.
1. To install Docker Engine via the apt repository, you need to configure Docker's apt repository. First, Add Docker's official GPG key :
marijan$ apt-get install ca-certificates curl
marijan$ install -m 0755 -d /etc/apt/keyrings
marijan$ curl -fsSL https://download.docker.com/linux/debian/gpg -o /etc/apt/keyrings/docker.asc
marijan$ chmod a+r /etc/apt/keyrings/docker.asc
2. Then, add the repository to Apt sources and update the system :
echo \
  "deb [arch=$(dpkg --print-architecture) signed-by=/etc/apt/keyrings/docker.asc] https://download.docker.com/linux/debian \
  $(. /etc/os-release && echo "$VERSION_CODENAME") stable" | \
  sudo tee /etc/apt/sources.list.d/docker.list > /dev/null

marijan$ apt-get update
2. Next, install Docker packages by executing the following command :
marijan$ apt-get install docker-ce docker-ce-cli containerd.io docker-buildx-plugin docker-compose-plugin
3. Lastly, to verify if everything works well, run an image :
marijan$ docker run hello-world
As explained in the compatibility section, Docker Engine is no longer supported by Kubernetes. To make it compatible, you must install cri-dockerd. However, to install cri-dockerd, you need to install Go first, as cri-dockerd is developed using this programming language.
1. To install Go, you need to download it from the official website :
marijan$ wget https://go.dev/dl/go1.22.4.linux-amd64.tar.gz
2. Once it is downloaded, you need to extract the file from the archive :
marijan$ tar -xzf go1.22.4.linux-amd64.tar.gz -C /usr/share/
3. Then, add Go to the PATH environment variable :
marijan$ export PATH=$PATH:/usr/local/go/bin
4. Finally, verify if everything works correctly by running the following command :
marijan$ go version
go version go1.22.4 linux/amd64
Now that we've installed Go, we can set up cri-dockerd.
1. First, you need to install Git Tools if it's not already installed :
marijan$ apt-get install git-all -y
2. Then, clone the repository from GitHub :
marijan$ git clone https://github.com/Mirantis/cri-dockerd.git
3. Once cloned, create a bin folder and build CRI using Go :
marijan$ cd cri-dockerd
marijan:~/cri-dockerd$ mkdir bin
marijan:~/cri-dockerd$ go build -o bin/cri-dockerd
4. Create another bin folder under the directory /usr/local :
marijan$ mkdir /usr/local/bin/cri-dockerd
5. Install cri-dockerd by executing the following commands :
marijan:~/cri-dockerd/bin$ install -o root -g root -m 0755 cri-dockerd /usr/local/bin
marijan:~/cri-dockerd$ install packaging/systemd/* /etc/systemd/system
marijan:~/cri-dockerd$ sed -i -e 's,/usr/bin/cri-dockerd,/usr/local/bin/cri-dockerd,' /etc/systemd/system/cri-docker.service
6. Finally, reload the daemon and enable the plugin :
marijan$ systemctl daemon-reload
marijan$ systemctl enable --now cri-docker.socket
6. You can ensure everything works well by running :
marijan$ systemctl status cri-docker.socket
Kubeadm, Kubelet and Kubeclt
Now that our container runtime has been set up, we can install all the tools needed to configure and manage our Kubernetes cluster.
1. First, install the packages needed to use the Kubernetes apt repository :
marijan$ apt-get install -y apt-transport-https ca-certificates curl gpg
2. Then, download the public signing key for Kubernetes package repositories :
marijan$ curl -fsSL https://pkgs.k8s.io/core:/stable:/v1.30/deb/Release.key | sudo gpg --dearmor -o /etc/apt/keyrings/kubernetes-apt-keyring.gpg
3. Add the appropriate Kubernetes apt repository :
marijan$ echo 'deb [signed-by=/etc/apt/keyrings/kubernetes-apt-keyring.gpg] https://pkgs.k8s.io/core:/stable:/v1.30/deb/ /' | sudo tee /etc/apt/sources.list.d/kubernetes.list
4. Update the apt package index then install and pin kubelet, kubeadm, and kubectl ::
marijan$ apt-get update
marijan$ apt-get install -y kubelet kubeadm kubectl
marijan$ apt-mark hold kubelet kubeadm kubectl
5. Enable the kubelet service before running kubeadm :
marijan$ systemctl enable --now kubelet
6. Finally, you have to disable the swap on the system. For Debian, comment the line about the swap in the folder /etc/fstab and reboot your system :
marijan$ vim /etc/fstab

# swap was on /dev/sda5 during installation
# UUID=e5c9c68a-3429-49b9-8747-b3af73000bc5 none            swap    sw              0       0
# /dev/sr0        /media/cdrom0   udf,iso9660 user,noauto     0       0

marijan$ reboot
Configuration
The configuration process is different between the Master and the Node machines.
Setting up the Network (Calico)
To set up a network in your Kubernetes cluster, there are multiple add-ons available, each with different functionalities. This information can be found here. In our case, we will use Calico.
This section specifically for the Master. Calico should not be configured on Node machines.
1. Run the following command to initiate your pods network with the CIDR required by Calico. Specify the CRI socket as well, which is cri-dockerd in this case :
marijan$ kubeadm init --pod-network-cidr=192.168.0.0/16 --cri-socket=unix:///var/run/cri-dockerd.sock
2. Now that it has been initiated, configure kubectl :
marijan$ mkdir -p $HOME/.kube
marijan$ cp -i /etc/kubernetes/admin.conf $HOME/.kube/config
marijan$ chown $(id -u):$(id -g) $HOME/.kube/config
3. Then, download the Calico networking manifest :
marijan$ curl https://raw.githubusercontent.com/projectcalico/calico/v3.28.0/manifests/calico.yaml -O
4. Apply the manifest once it is downloaded :
marijan$ kubectl apply -f calico.yaml
5. Finally, check if Calico status is set to Running :
marijan$ kubectl get pods -A

NAMESPACE     NAME                                       READY   STATUS    RESTARTS   AGE
kube-system   calico-kube-controllers-564985c589-qf9cs   1/1     Running   0          21m
kube-system   calico-node-qtvz2                          1/1     Running   0          21m
kube-system   coredns-7db6d8ff4d-6m78v                   1/1     Running   0          94m
kube-system   coredns-7db6d8ff4d-bzxk9                   1/1     Running   0          94m
kube-system   etcd-deb-vm-01                             1/1     Running   0          94m
kube-system   kube-apiserver-deb-vm-01                   1/1     Running   0          94m
kube-system   kube-controller-manager-deb-vm-01          1/1     Running   0          94m
kube-system   kube-proxy-k96tw                           1/1     Running   0          94m
kube-system   kube-scheduler-deb-vm-01                   1/1     Running   0          94m
Connecting Nodes
Once the network is set up, you can connect your Nodes to the cluster.
1. Firstly, you need to generate a token and the public key on the Master :
marijan$ kubeadm token create
5didvk.d09sbcov8ph2amjw

marijan$ openssl x509 -pubkey -in /etc/kubernetes/pki/ca.crt | openssl rsa -pubin -outform der 2>/dev/null | \
> openssl dgst -sha256 -hex | sed 's/^.* //'

8cb2de97839780a412b93877f8507ad6c94f73add17d5d7058e91741c9d5ec78
2. Then, execute the join command on the Node machine:
marijan$ kubeadm join --token 5didvk.d09sbcov8ph2amjw 172.16.0.10:6443 --discovery-token-ca-cert-hash sha256:8cb2de97839780a412b93877f8507ad6c94f73add17d5d7058e91741c9d5ec78 --cri-socket=unix:///var/run/cri-dockerd.sock
- --token : token generate before
- HOST:PORT : (6443 is the default port for kubeadmin)
- --discovery-token-ca-cert-hash sha256: : public key generate before
- --cri-socket : Container Runtime used
Enable auto-completion kubectl commands (bash)
If you want to enable auto-completion for all kubectl commands in your shell (bash), or use the shortcut k to run kubectl commands, execute the following command :
marijan$ source <(kubectl completion bash) && alias k=kubectl && complete -F __start_kubectl k
The source command enables auto-completion for all kubectl commands in your current session. The alias command defines k as a shortcut for kubectl, so you can type k instead of kubectl. The complete command ensures that the alias k benefits from the same auto-completion as kubectl.
Once this is done, you need to reload your shell configuration to make it permanent:
marijan$ source ~/.bashrc
Bugs
Here is a list of bugs you might encounter.
Connection refused
After booting my virtual machine where Kubernetes was running, I got the following error :
E0624 15:01:00.267236    2317 memcache.go:265] couldn't get current server API group list: Get "https://172.16.0.10:6443/api?timeout=32s": dial tcp 172.16.0.10:6443: connect: connection refused
E0624 15:01:00.267541    2317 memcache.go:265] couldn't get current server API group list: Get "https://172.16.0.10:6443/api?timeout=32s": dial tcp 172.16.0.10:6443: connect: connection refused
E0624 15:01:00.269180    2317 memcache.go:265] couldn't get current server API group list: Get "https://172.16.0.10:6443/api?timeout=32s": dial tcp 172.16.0.10:6443: connect: connection refused
E0624 15:01:00.269548    2317 memcache.go:265] couldn't get current server API group list: Get "https://172.16.0.10:6443/api?timeout=32s": dial tcp 172.16.0.10:6443: connect: connection refused
E0624 15:01:00.271094    2317 memcache.go:265] couldn't get current server API group list: Get "https://172.16.0.10:6443/api?timeout=32s": dial tcp 172.16.0.10:6443: connect: connection refused
I fixed this by restarting the kubelet service. Ensure that kubelet and your Container Engine are running properly.
If it doesn’t work, verify that the configuration file is set up correctly on the worker node :
marijan$ kubectl config view

apiVersion: v1
clusters: null
contexts: null
current-context: ""
kind: Config
preferences: {}
users: null
If it’s not configured correctly, check if the kubelet.conf file is set up (if not, refer back to the step on Connecting Nodes) and execute the following command :
mkdir -p ~/.kube
sudo cp /etc/kubernetes/admin.conf ~/.kube/config
sudo chown $(id -u):$(id -g) ~/.kube/config
Manifest file (YAML)
Here are two ways to create an object in Kubernetes :
- Imperative : Create an object through a command ;
- Declarative : Create an object through a manifest file.
Manifest or configuration file is developed with Yet Another Markup Language (YAML) files are used as input for the creation of objects such as Pods, Deployments, ReplicaSets, and more.
In Kubernetes, a .yml file begins with these four main sections, which are required in the configuration file :
marijan$ cat yaml-definition.yml

apiVersion: <version-object>
kind: <object>
metadata:


spec:
Here are the four main sections detailed and explained :
- apiVersion : This specifies the version of the Kubernetes API to use. Each type of object has its own version, which could be different from others.
- kind : This specifies the type of object you are going to create.
- metadata : This section contains data about the object being deployed, such as names, labels, and application-specific information. All the data specified under metadata should be written as a dictionary. They will be the children of the metadata section, so proper indentation is required.
- spec : This section specifies the desired state of the object, such as the containers in a Pod. Similar to metadata, the data here is written as a dictionary. The dash "-" indicates the beginning of the first item in a list.
Once the file is ready to be deployed, you can run the following command to create the YAML configuration and create the resources in Kubernetes. Instead of using the -f option, you can directly specify the type of object you want to run :
marijan$ kubectl create -f yaml-definition.yml
If you have a running object and you don't have the .yml file, you can extract it to make modifications :
marijan$ kubectl get <object> <name> -o yaml <file>.yml
You can as well create a yaml file (or other, as JSON) by running a command to create for example a pod without have to set up the .yml file :
marijan$ kubectl run <pod> --image=<image> -o yaml > <file.yml>
To perform a scaling of your object without having to shut down pods, you can run the following command:
marijan$ kubectl replace -f <name>.yml
It is possible to modify a specific part of the .yml file, for example, to increase the number of replicas :
marijan$ kubectl scale --<parameter>=<value> -f <name>.yml
You can also edit a running .yml file using the following command:
marijan$ kubectl edit <object> <name>
If you want to simulate running a pod without actually executing it, you can add the parameter --dry-run. It will run the command and show the result without actually performing the operation :
marijan$ kubectl run nginx --image=nginx --dry-run
Commands and Arguments
It's possible to configure commands in a pod by defining the command we want to execute and its arguments under the containers section.
For instance, in the example below, we have defined the command printenv with the argument HOSTNAME, KUBERNETES_PORT, which means the pod will show the hostname and the port used.
marijan$ cat cmd_args_definition.yml

apiVersion: v1
kind: Pod
metadata:
    name: cmd-arg-demo
    labels:
        app: cmd-arg-demo
spec:
    containers:
        - name: cmd-arg-demo-container
          image: debian
          command: ["printenv"]
          args: ["HOSTNAME", "KUBERNETES_PORT"]
In Docker, within a Dockerfile, the command is represented by ENTRYPOINT and the argument by CMD.
Environnement Variables
Environnement Variables are used to store values by a specific name defined. In Kubernetes, there is three main type of environnement variable ; Plain Key Value, ConfigMap and Secret.
Plain Key Value
Plain Key-Value is the basic configuration for setting up an environment variable. You simply define the name of the variable, followed by its value. Here is an example below :
env
  - name: FULLNAME
    value: Marijan Stajic
Each environment variable is listed as an item, and any item under the environment starts with a dash "-".
ConfigMap
If you have many pods that are using the same variables, or you just have a lot of variables and you would like to reduce your code, you can create a ConfigMap file.
ConfigMaps are used to store data as key-value pairs in another file and are divided into two parts : creating a ConfigMap and injecting it into a Pod.
As with any Kubernetes object, there are two ways to create a ConfigMap. To deploy it imperatively, you can simply create the file by specifying the key and the value.
marijan$ kubectl create configmap <config-name> --from-literal=<key>=<value>
However, this method could be complicated once you have multiple variables to add.
You can also create it by importing the configuration from a properties file:
marijan$ kubectl create configmap <config-name> --from-file=<path-to-file>
The second way to deploy a ConfigMap is, obviously, by the declarative way, which involves setting up a .yml file. Inside, as with any object, you need to specify the apiVersion, kind, and define the name under the metadata. Create an item data and add the key-value pairs for each variable, then create it.
marijan$ cat configmap-definition.yml

apiVersion: v1
kind: ConfigMap
metadata:
    name: <name>
data:
    <key1>: <value>
    <key2>: <value>
Once is created, you can get all of configmap running on the machine :
marijan$ kubectl get configmaps

NAME       DATA    AGE
<name>      1      20d
Now, to inject an environment variable into your pod, add the following property under the containers section :
envFrom:
    - configMapRef:
        name: <name>
The name specified is related to the name under the metadata of your ConfigMap file. To connect the ConfigMap to your Pod, you must set the name accordingly.
There are different ways to inject ConfigMap into Pods, for instance, by using single environment variables or volumes.
Single environment variables are used to add only specific values from the ConfigMap file. The item name changes slightly :
env:
    - name: <variable/key>
      valueFrom:
        configMapKeyRef:
            name: <name>
            key: <variable/key>
Here, the only things that change are envFrom, which is replaced by valueFrom, and in configMapKeyRef, you need to add key. Then, under it, you specify the name of the ConfigMap and the key you are trying to access.
Secret
The secret environment variable is used to store sensitive values such as credentials.
When setting up a web server connected to a database, for example, where you need to specify login credentials, storing them in plain text is not secure because the information is exposed.
Instead of writing credentials in a plain key-value pair or a ConfigMap file, it's advisable to use a Secret file where values are stored securely.
The process of setting up a Secret file is similar to that of a ConfigMap. The creation steps are exactly the same, except for the encoding part.
Before storing credentials in your .yml file (or in your command line if you are creating a Secret file imperatively), you should encode them in base64. To do this, execute the following command:
marijan$ echo -n "<value>" | base64

<base64-encoded-value>
The command will output the encoding value. Then, you just need to add it to your .yml file or command.
In your .yml file, don't forget to specify the apiVersion, kind, and name of your Secret :
apiVersion: v1
kind: Secret
metadata:
    name: <name>
data:
    <key>: <base64-encoded-value>
And in your command, specify that you are creating a Secret and generic file :
marijan$ kubectl create secret generic <secret-name> --from-literal=<key>=<value>
Ensure to replace <value> with the actual sensitive information you want to encode and <name> with the desired name of your Secret.
It's possible to decoded data. To do it, just run the following command :
marijan$ echo -n "<base64-encoded-value>" | base64 --decode

<base64-decoded-value>
Now, to inject it into Pods, the process is quite similar to using a ConfigMap. Add the following information under the containers section of your Pod configuration :
envFrom:
    - secretRef:
        name: <name>
As with ConfigMaps, the name specified here corresponds to the name under the metadata of your Secret file. This connection is essential to link the Secret to your Pod correctly.
You can configure a Pod to use specific values from a Secret file or use the entire Secret as volumes. To configure a specific value, you need to adjust the following information :
env:
    - name: <variable/key>
      valueFrom:
          secretKeyRef:
              name: <name>
              key: <variable/key>
Here, the only changes are replacing envFrom with valueFrom, and in secretKeyRef, adding key. Under secretKeyRef, specify the name of the Secret and the specific key you want to access.
For volumes, add a section named volumes and specify secretName, which is the name of your Secret file :
volumes:
    - name: <volume>
      secret:
        secretName: <name>
Objects (Resources)
This section is aobut the Objects in Kubernetes used to deploy, manage, and scale applications in the cluster.
Replications
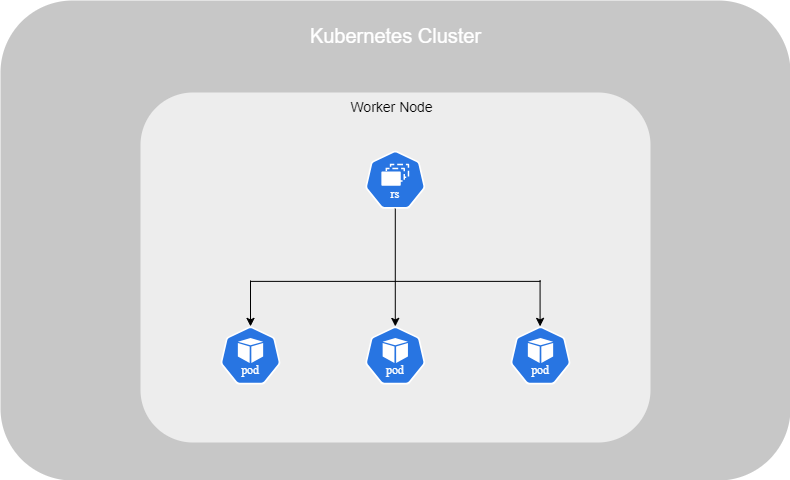
A Replica Set ensures high availability of Pods in our cluster. It manages the replacement of failed Pods, load-balancing, and scaling in response to an increase in the number of users.
You can set up a Replica Set in different ways. First, if you have a single node with one Pod and that Pod fails, it will automatically be replaced.
Another possibility, as mentioned earlier, is that if the number of users increases, the Replica Set can manage load-balancing and scaling by duplicating the Pod or creating identical Pods on other nodes.
This setup is not only for load-balancing and scaling but also ensures high availability by replacing failed Pods.
The Replica Set has a predecessor called the Replication Controller. The Replication Controller is older and has been replaced by the Replica Set because it lacks the flexibility that the Replica Set offers.
To set up Replica Set, you have to implant that on your .yml file :
marijan$ cat replicaset-definition.yml

apiVersion: apps/v1
kind: ReplicaSet
metadata:
  name: myapp-ReplicaSet
  labels:
    app: myapp
    type: front-end
spec:
  template:
    metadata:
      name: myapp-pod
      labels:
        app: myapp
        type: front-end
    spec:
      containers:
      - name: nginx-container
        image: nginx
  replicas: 1
  selector:
    matchLabels:
      type: front-end
As we done in the previous section about YAML, the four main sections are present: apiVersion, kind, metadata, and spec. In this section, we will change the apiVersion and kind. Instead of deploying a Pod, we will deploy a ReplicaSet.
We will add a template section, where we will provide the content of our Pod, including its name, labels, and containers in the spec section. Additionally, we will add replicas to specify the number of replicas we want to have.
Furthermore, we will add a selector. This is a major difference between a ReplicationController and a ReplicaSet, as the previous one does not provide this option.
The selector is used to avoid duplicating an existing Pod. Here is a scenario :
1. You already have a running Nginx pod.
marijan$ kubectl get pods
NAME        READY   STATUS    RESTARTS   AGE
nginx-pod   1/1     Running   0          2m43s
2. You then set up a ReplicationController file without a selector because this option is not available in it. Inside this file, you have the exact same pod configuration as the existing and running Pod. If you start this ReplicationController, it will run the pod without checking if it already exists. If the original Nginx Pod crashes, it will not be recreated because another Pod was already created :
marijan$ cat replicationcontroller-definition.yml

apiVersion: v1
kind: ReplicationController
metadata:
  name: myapp-ReplicationController
  labels:
    app: myapp
    type: front-end
spec:
  template:
    metadata:
      name: nginx-pod
      labels:
        app: nginx
        type: front-end
    spec:
      containers:
      - name: nginx-container
        image: nginx
  replicas: 1

marijan$ kubectl create -f replicationcontroller-definition.yml
replicationcontroller.apps/myapp-ReplicationController created

marijan$ kubectl get pods
NAME                                READY   STATUS    RESTARTS   AGE
nginx-pod                           1/1     Running   0          2m43s
myapp-ReplicationController-4j8wk   1/1     Running   0          2m43s
3. With the selector included in a ReplicaSet, when you execute the YAML file, it will check if a pod with this label already exists. If it does, it will complete the number of Pods if any are missing, and if not, it will maintain the already existing ones.
marijan$ cat replicaset-definition.yml

apiVersion: apps/v1
kind: ReplicaSet
metadata:
  name: myapp-ReplicaSet
  labels:
    app: myapp
    type: front-end
spec:
  template:
    metadata:
      name: myapp-pod
      labels:
        app: myapp
        type: front-end
    spec:
      containers:
      - name: nginx-container
        image: nginx
  replicas: 1
  selector:
    matchLabels:
      type: front-end

marijan$ kubectl create -f replicaset-definition.yml
replicaset.apps/myapp-replicaset created

marijan$ kubectl get pods
NAME                                READY   STATUS    RESTARTS   AGE
nginx-pod                           1/1     Running   0          2m43s
Deployments
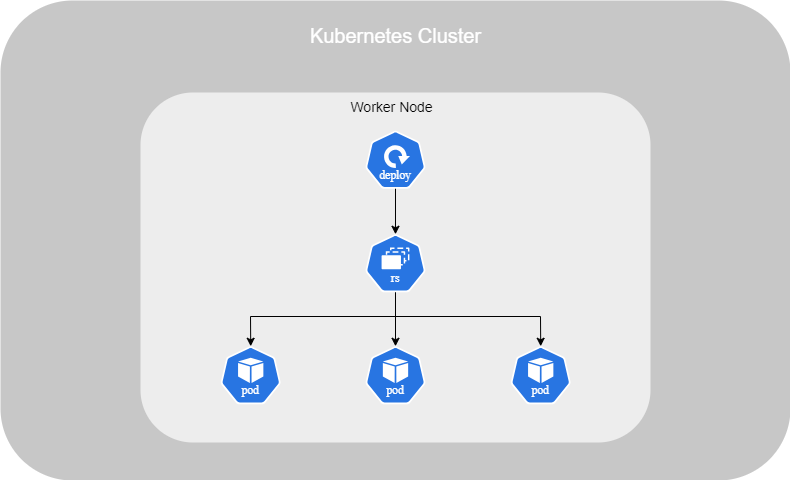
The advantage of setting up a Deployment file on Kubernetes is that it automates various processes such as deployment, upgrading instances, undoing recent changes, and making multiple changes to the application.
To fully benefit from using a Deployment, you should have several Pods running. Because to avoid to interruput the service, if you have multiple Pods running, the Deployment will do it one by one.
In fact, within a Deployment, you will find a ReplicaSet, which is responsible for running all the containers and ensure if one of them crash. The Deployment sits above the ReplicaSet to automate various processes listed before.
Just like with a ReplicaSet, you need to set up a .yml file for a Deployment. The sections are exactly the same as those in a ReplicaSet, except for the kind :
marijan$ cat deployment-definition.yml

apiVersion: apps/v1
kind: Deployment
metadata:
  name: myapp-deployment
  labels:
    app: myapp
    type: front-end
spec:
  template:
    metadata:
      name: myapp-pod
      labels:
        app: myapp
        type: front-end
    spec:
      containers:
      - name: nginx-container
        image: nginx
  replicas: 3
  selector:
    matchLabels:
      type: front-end
To create a Deployment or any other object such as a ReplicaSet or Pod, you don't necessarily need to set up a .yml file. In fact, you can do it by running a single command.
marijan$ kubectl create deployment myapp-deployment --image=busybox --replicas=3
Here, I have created a Deployment named myapp-deployment using the image busybox and set it to have 3 replicas. And to list all of object in same time, execute the following command :
marijan$ kubectl get all

NAME                                    READY   STATUS        RESTARTS   AGE
pod/myapp-deployment-7969484b57-5c2cr   0/1     Pending       0          13s
pod/myapp-deployment-7969484b57-fjlh6   0/1     Pending       0          13s
pod/myapp-deployment-7969484b57-tfj4n   0/1     Pending       0          13s

NAME                 TYPE        CLUSTER-IP   EXTERNAL-IP   PORT(S)   AGE
service/kubernetes   ClusterIP   10.96.0.1    <none>        443/TCP   5d1h

NAME                               READY   UP-TO-DATE   AVAILABLE   AGE
deployment.apps/myapp-deployment   0/3     3            0           13s

NAME                                          DESIRED   CURRENT   READY   AGE
replicaset.apps/myapp-deployment-7969484b57   3         3         0       14s
Namespaces
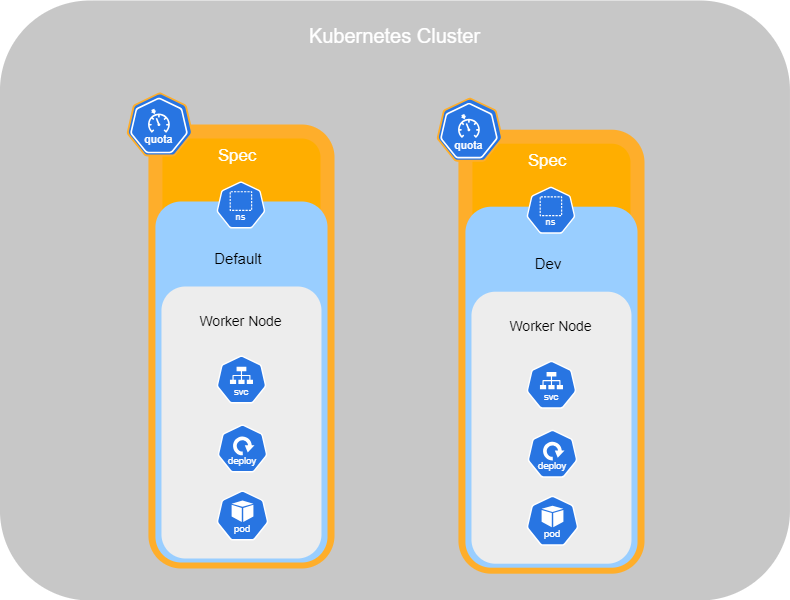
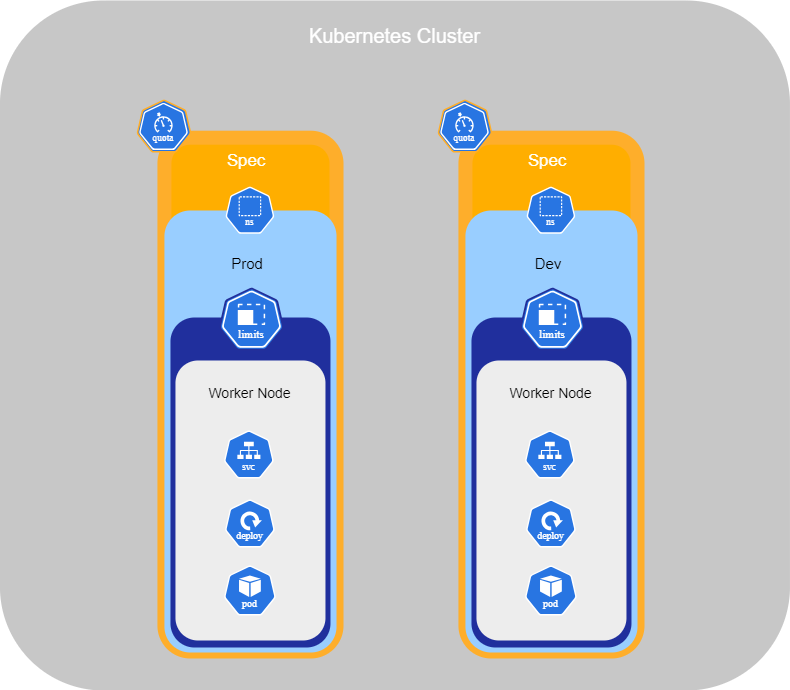
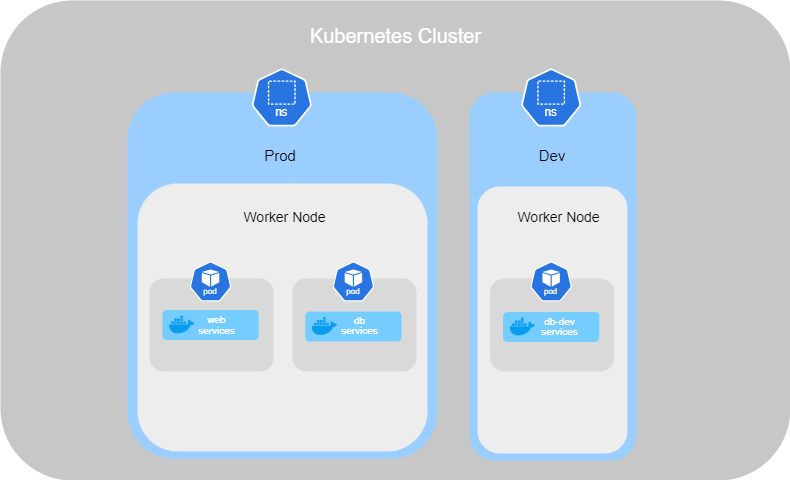
Namespaces in Kubernetes are like houses where services run inside. By default, when you set up services in your cluster, they are all created in the default namespace, which is called Default. This is sufficient when using Kubernetes for testing or when working alone.
Kubernetes also creates the namespaces kube-system and kube-public by default. kube-system is a required namespace used by services such as networking, DNS, and more. kube-public is a namespace used to make resources available to all users, similar to a public folder.
However, when you have a large enterprise with different departments needing containers, you can create new namespaces in order to separate resources. Separating resources helps prevent accidental deletion or modification of services.
Each namespace can have its own policies to define what actions users can perform. You can also assign resource quotas for each of them. For example, you can create a namespace called Dev for your developers and Prod for the production containers. Then, we can restrict access for certain individuals to the production environment and allocate limited resources for the Dev environment
As with any object in Kubernetes, you can set up a namespace through a .yml filen:
marijan$ cat namespace-definition.yml

apiVersion: v1
kind: Namespace
metadata:
    name: dev
By default, the namespace used is Default. When you run a Pod, it will automatically be created in the default namespace. However, you can change the default namespace after it is created by executing:
marijan$ kubectl config set-context $(kubectl config current-context) --namespace=dev
To specify in which namespace a Pod should run, you can add the name of the namespace under the metadata section of the .yml file:
marijan$ cat pod-definition.yml

apiVersion: v1
kind: Pod
metadata:
    name: myapp-pod
    namespace: dev
    labels:
        app: myapp
        type: front-end
spec:
    containers:
        - name: nginx-container
          image: nginx
Alternatively, you can specify the namespace when you are running the Pod :
marijan$ kubectl create -f pod-definition.yml --namespace=dev
Finally, to get the existing pods running in a different namespace, you should run the following command :
marijan$ kubectl get pods --namespace=dev
Resource Quotas
To limit the resources in a namespace, you have set up a resource quota.
Indeed, you can limit the number of pods, CPU usage, memory, and more. Here is an example of a .yml file for ResourceQuota :
marijan$ cat resourcequota-definition.yml

apiVersion: v1
kind: ResourceQuota
metadata:
    name: Resource Quota
    namespace: dev
spec:
    hard:
        pods: "10"
        requests.cpu: "4"
        requests.memory: 5Gi
        limits.cpu: "10"
        limits.memory: 10Gi
Limit Range
With the resource quota, you have limited the resources available in a namespace. Additionally, if you want to limit the consumption of resources or set a minimum requirement for resources for pods running the namespace, you can set up a limit range.
Indeed, with a limit range, you can set the resources for all pods running in the namespace without having to configure each one individually. Here is an example of a .yml file for a Limit Range :
marijan$ cat limiterange-definition.yml

apiVersion: v1
kind: LimitRange
metadata:
    name: Limit Range
spec:
    limits:
    - default:
        cpu: 500m
      defaultRequest:
        cpu: 500m
      max:
        cpu: "1"
      min:
        cpu: 100m
      type: Container
The limit range for the CPU and the memory should be set up in different file.
Services
On Kubernetes, a service is considered an object. One of the aims of a Service is that you don't have to modify a running application to make it compatible with the network configuration. Indeed, you can run the code in Pods to expose it to the network, allowing clients to interact with it.
To set up a Service, you have to implant on your .yml file :
marijan$ cat service-definition.yml

apiVersion: v1
kind: Service
metadata:
  name: service-definition
spec:
  selector:
    app.kubernetes.io/name: MyApp
  ports:
    - protocol: TCP
      port: 80
      targetPort: 9376
The .yml file includes the four main sections required for defining a Service object, each populated with specific information relevant to configuring Services.
Under the spec section, you specify the name of the Pods targeted and define the ports along with their respective settings.
As any object, you don't have to set up a .yml file to deploy a service. Indeed, you can deploy it by using the following command :
marijan$ kubectl expose service-definition --port=80 --protocole=TCP --target=9376
Pods
When you deploy an application in a container, Kubernetes automatically creates a Pod, and the application is encapsulated inside it.
Another benefit of using a Pod is that if you need to delete, for example, the web server, the associated database will be deleted as well.
You can set up a Pod through a .yml file :
marijan$ cat pod-definition.yml

apiVersion: v1
kind: Pod
metadata:
    name: myapp-pod
    labels:
        app: myapp
        type: front-end
spec:
    containers:
        - name: nginx-container
          image: nginx
The four main sections are present: apiVersion, kind, metadata, and spec. In this section, we will add the apiVersion and kind.
In the metadata, we'll include the name of our application, and the labels serve as descriptions. The app label indicates the application this pod is associated with, while the type label specifies the function of this pod.
Under the spec section, we've added containers with the name of our container and the corresponding image used. The dash "-" indicates the beginning of the first item in a list
With the kubectl command, you can list all of the Pods existing on the nodes, along with information such as their status, names, and more :
marijan$ kubectl get pods

NAME        READY   STATUS    RESTARTS   AGE
myapp-pod   1/1     Running   0          5m58s
To know on which node the pods is running, add the parameter -o wide at the end :
marijan$ kubectl get pods -o wide

NAME        READY   STATUS              RESTARTS   AGE   IP       NODE        NOMINATED NODE   READINESS GATES
myapp-pod   0/1     ContainerCreating   0          4s    <none>   deb-vm-02   <none>           <none>
To get more information about a specific pod, you can run the command describe followed by the type of object (pod) and his name.
marijan$ kubectl describe pod myapp-pod
To delete a running pod, execute the command delete followed by the type of object (pod) and his name.
marijan$ kubectl delete pod myapp-pod
To run a Pod without having to setting up a .yml file, you can execute the following command :
marijan$ kubectl run <image> --image=<image>
Multi-Container
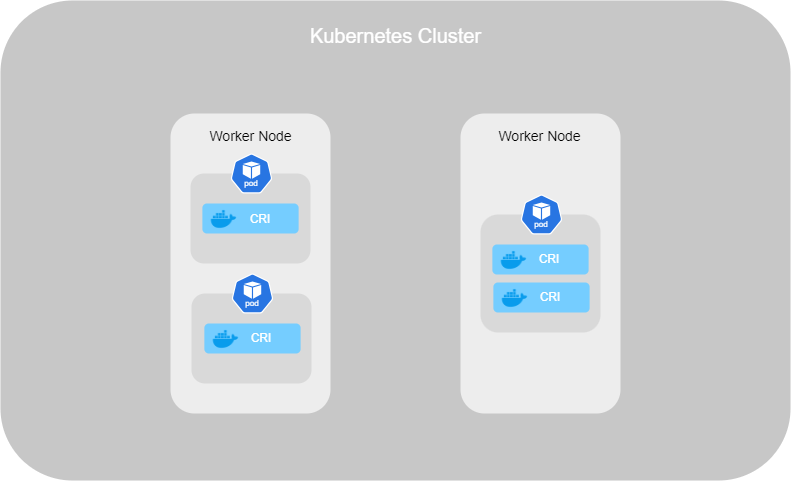
You can run two containers in the same Pod. This is useful when, for example, you have a web server that needs a log agent. You can deploy both in the same Pod because they share the same lifecycle.
Lifecycle means that they are deployed and destroyed together. Additionally, they share the same network space, allowing them to refer to each other as localhost. They also have access to the same storage volume, so you don't need to establish volume sharing or services between them to facilitate communication.
You can set up a multi-container Pod by just adding a image and name under the container section :
marijan$ cat pod-definition.yml

apiVersion: v1
kind: Pod
metadata:
    name: webapp
    labels:
        app: webapp
spec:
    containers:
        - name: webapp
          image: webapp
        - name: log-agent
          image: log-agent
As already know, with the kubectl command, you can list all of the Pods existing on the nodes. To know how many containers are running inside a pod, you can see it under the READY section :
marijan$ kubectl get pods

NAME        READY   STATUS    RESTARTS   AGE
webapp      2/2     Running   0          5m58s
Design Patterns
There are three different Design Patterns in Kubernetes for multi-container Pods.
- Sidecar Pattern : the sidecar is an additional container used to assist the primary container with tasks such as logging, monitoring, and security.
- Adapter Pattern : as the name suggests, the adapter container is used to adapt data. For example, if you have multiple logs in different formats that need to be sent to a central server in a common format, the adapter will handle the necessary data conversion.
- Ambassador Pattern : is an additional container that acts as a proxy. For instance, when deploying an application in different environments such as Dev, Test, or Prod, the ambassador container will automatically route requests to the correct database or service based on the deployment environment.
Init Containers
As explained above, the containers share the same lifecycle. If one is destroyed, the other will be destroyed as well. However, if your application needs to run a script or perform an initialisation task that doesn't require continuous running, you can use an Init Container.
An Init Container is a container that is deployed once, runs its script or performs its task, and then is destroyed, without affecting the primary container. It is essentially a one-time container designed for initialisation purposes.
If you have multiple Init Containers, they will run sequentially. If the first one hasn't finished, the second one won't start. Additionally, if an Init Container fails, kubelet will retry until it succeeds. However, if the container's restart policy is set to stop on failure, the entire Pod will stop running.
You can add initContainers section in your Pod .yml file :
marijan$ cat pod-definition.yml

apiVersion: v1
kind: Pod
metadata:
    name: myapp-pod
    labels:
        app: myapp
        type: front-end
spec:
    containers:
        - name: nginx-container
          image: nginx
    initContainers:
        - name: init-myservice
          image: busybox
          command: \['sh', '-c', 'git clone  ;'\]
Design
Labels, Selectors & Annotations
To maintain a well-structured infrastructure and easily find information, you can assign labels to objects. This helps categorise services effectively, allowing you to group them by type, functionality, etc.
To do this, you need to add a label category under the metadata, followed by the defined category and name :
marijan$ cat pod-definition.yaml

apiVersion: v1
kind: Pod
metadata:
    name: webserver
    labels:
        app: App1
        function: Service
spec:
    containers:
    - name: webserver
      image: nginx
Once defined, you can use a selector to retrieve the label you need by running the following command:
marijan$ kubectl get pods --selector function=Service

NAME        READY   STATUS    RESTARTS     AGE
webserver   1/1     Running   2 (7d ago)   78d
You can also define labels in resources such as ReplicaSet. In a ReplicaSet, labels are specified in three parts:
Under metadata for the ReplicaSet in general. Under selector, the matchLabels. Finally, under the metadata of the template.
marijan$ cat replicaset-definition.yml

apiVersion: apps/v1
kind: ReplicaSet
metadata:
  name: myapp-ReplicaSet
  labels:
    app: myapp
    type: front-end
spec:
  template:
    metadata:
      name: myapp-pod
      labels:
        app: myapp
        type: front-end
    spec:
      containers:
      - name: nginx-container
        image: nginx
  replicas: 1
  selector:
    matchLabels:
      type: front-end
Finally, you have Annotations. You can add additional informations about the Pod such as the buildversion or contact informations for instance.
marijan$ cat replicaset-definition.yml

apiVersion: apps/v1
kind: ReplicaSet
metadata:
  name: myapp-ReplicaSet
  labels:
    app: myapp
    type: front-end
  annotations:
     buildversion: 1.10
spec:
  template:
    metadata:
      name: myapp-pod
      labels:
        app: myapp
        type: front-end
    spec:
      containers:
      - name: nginx-container
        image: nginx
  replicas: 1
  selector:
    matchLabels:
      type: front-end
Rollout and Versioning
Once a Deployment is created, a Rollout is automatically initiated. The Rollout also creates a new Revision. In the future, whenever the application is updated, a new Revision will be created again.
This process helps keep track of changes and allows us to roll back to a previous version if needed.
To create a new Rollout, you can run the following command, followed by the deployment name:
marijan$ kubectl rollout status deployment/<deployment>
Waiting for deployment "myapp-wiki-deployment" rollout to finish: 1 out of 3 new replicas have been updated...
In order to check the history of a Rollout, run the following command :
# kubectl rollout history deployment <deployment>
deployment.apps/myapp-wiki-deployment
REVISION  CHANGE-CAUSE
1         <none>
2         <none>
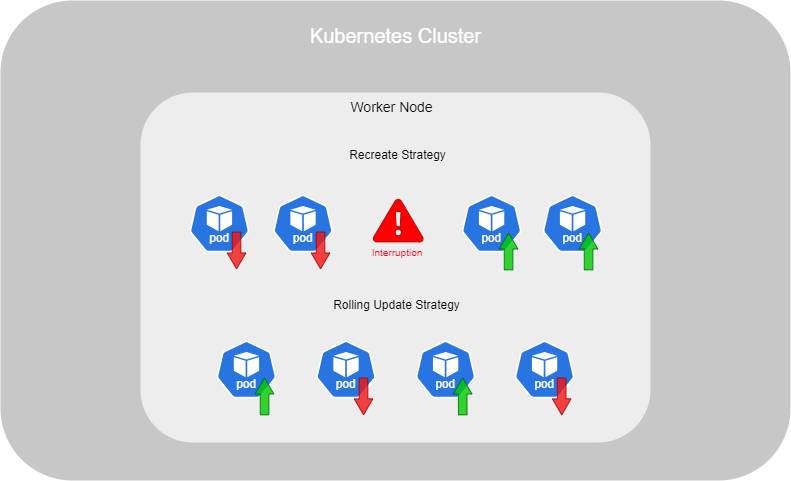
There are two available strategies. The first strategy, called Recreate, destroys all instances of the Deployment and then creates new ones. However, this strategy is not recommended because the application will be unavailable during this time.
The recommended and default strategy is called Rolling Update. It involves gradually replacing old instances with new ones, one at a time, ensuring that the service remains available throughout the process.
A new version of an application is defined by modifying its labels, annotations, or the image version being used. To apply these changes, you can run the following command, followed by the file name.
marijan$ kubectl apply -f <file.yml>
While it is possible to update the application by directly modifying the image or annotations through a command, this approach is not recommended. If the resource is later destroyed and recreated, it will revert to the previous version.
marijan$ kubectl set image deployment <deployment> \<container>=<image>:<version>
You can now run a Rollout to update the application. However, if an issue arises after the Rollout, you can undo it by executing the following command:
kubectl rollout undo deployment myapp-wiki-deployment
deployment.apps/myapp-wiki-deployment rolled back
To set a different strategy for your object, you need to add the following section to the YAML configuration :
marijan$ cat deployment-definition.yml

apiVersion: apps/v1
kind: Deployment
metadata:
  name: myapp-deployment
  labels:
    app: myapp
    type: front-end
spec:
  template:
    strategy:
      type: Recreate
    metadata:
      name: myapp-pod
      labels:
        app: myapp
        type: front-end
    spec:
      containers:
      - name: nginx-container
        image: nginx
  replicas: 3
  selector:
    matchLabels:
      type: front-end
Deployment Strategy
Additional Deployment Strategy over Rolling Update and Recreate.
Blue / Green
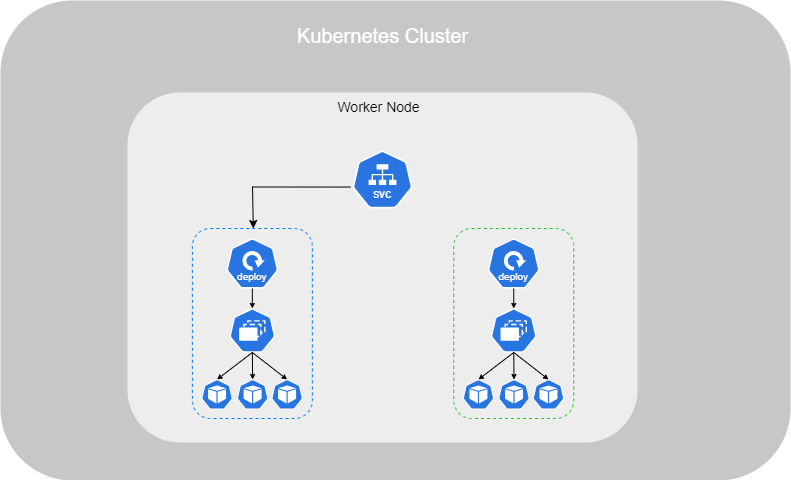
The Blue/Green Deployment Strategy involves maintaining two environments. The first environment, known as blue, runs the current version of the application, while the second environment, green, hosts the new version.
After testing is complete and the new version is ready for deployment, traffic can be switched to the green environment.
This process leverages the service's label selector. For example, the blue deployment could be labeled as version1, and the green as version2. Once all checks are successful and the green environment is ready, you simply update the service's label selector to point to the green deployment.
Here is the service configuration file :
marijan$ cat service-definition.yml

apiVersion: v1
kind: Service
metadata:
  name: service-definition
spec:
  selector:
    version: v1
Then, here is the configuration file for the deployment :
marijan$ cat deployment-definition.yml

apiVersion: apps/v1
kind: Deployment
metadata:
  name: myapp-deployment
  labels:
    app: myapp
    type: front-end
spec:
  template:
    metadata:
      name: myapp-pod
      labels:
        version: v1
    spec:
      containers:
      - name: nginx-container
        image: nginx
  replicas: 3
  selector:
    matchLabels:
      version: v1
The benefit of this configuration is that you can deploy the new application for testing, perform all necessary tests, and once they are completed, simply change the selector on your service. This will automatically route all traffic to the new version.
Canary
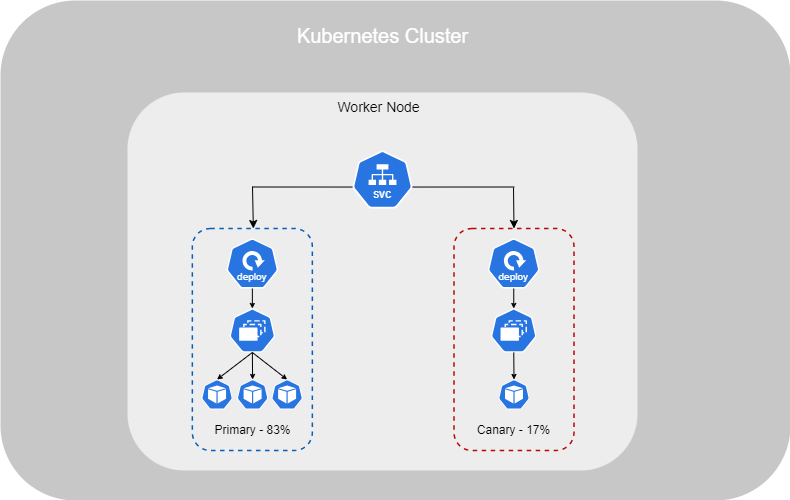
The Canary Deployment Strategy involves deploying only one Pod with the new version, while routing a small portion of traffic to it, with the rest remaining on the previous version. Once all tests have been completed and the new version is ready for deployment, all Pods are upgraded using a Rolling Update (or Recreate, if configured that way).
To perform a Canary Deployment, you need two separate deployments. The first is the primary deployment, where all Pods are running the older version. The canary deployment contains only one Pod running the new version. Similar to the Blue/Green strategy, a service defines which deployment should be used.
To deploy your service across two deployments, you need to set a new label for both. For instance, let's use front-end as the label. This allows traffic to be routed between the primary and canary deployments.
Here is an example of configuration, for service :
marijan$ cat service-definition.yml

apiVersion: v1
kind: Service
metadata:
  name: service-definition
spec:
  selector:
    app: front-end
Here is the configuration file for the primary deployment :
marijan$ cat deployment-primary.yml

apiVersion: apps/v1
kind: Deployment
metadata:
  name: myapp-deployment
  labels:
    app: myapp
    type: front-end
spec:
  template:
    metadata:
      name: myapp-pod
      labels:
        version: v1
        app: front-end
    spec:
      containers:
      - name: nginx-container
        image: nginx
  replicas: 3
  selector:
    matchLabels:
        app: front-end
Then, here is the configuration file for the canary deployment :
marijan$ cat deployment-primary.yml

apiVersion: apps/v1
kind: Deployment
metadata:
  name: myapp-deployment
  labels:
    app: myapp
    type: front-end
spec:
  template:
    metadata:
      name: myapp-pod
      labels:
        version: v2
        app: front-end
    spec:
      containers:
      - name: nginx-container
        image: nginx
  replicas: 1
  selector:
    matchLabels:
        app: front-end
Jobs
There are different types of workloads, such as those that run for long periods (like web servers or applications) and Jobs, which run only for a short time (sending an email or generating a report).
You can create a Pod to perform a quick task and set the restartPolicy to Never, in order to avoid that your Pod restart multiple time the same task.
For a single task, this approach may work. However, if you have multiple tasks to complete, it is recommended to use Jobs. Here is an example of configuration :
marijan$ cat job-definition.yml

apiVersion: batch/v1
kind: Job
metadata:
  name: mytask-job
spec:
  parallelism: 3
  completions: 3
  template:
    spec:
      containers:
        - name: mytask-job
          image: ubuntu
          command: ['expr', '3', '+', '2']

      restartPolicy: Never
In this example, we have set the apiVersion to batch/v1 and the kind to Job. Under the spec section, we’ve defined completions as 3 (number of Jobs that have to be created), parallelism, how many should be create in the same time and within the template, we’ve specified the container details and the command we want to execute.
A Job is similar to a Pod, so you need to provide the same information as you would for a Pod (restartPolicy, containers, etc.). You can also use the same command structure for your Job as you would for a Pod :
To check the outcome of the process run by your Pod, you can view it in the logs :
marijan$ kubectl logs <jobs>
Cron Jobs
A CronJob is a Job where you can define a schedule to run it periodically, for example, once per week, day, or month. The configuration is similar to that of a Job, but with a CronJob, you must specify the kind as CronJob and define the schedule. Here is an example :
marijan$ cat cron-job-definition.yml

apiVersion: batch/v1
kind: CronJob
metadata:
  name: reporting-cron-job
spec:
  schedule: "* * * * *"
  jobTemplate:
    spec:
      completions: 3
      parallelism: 3
      template:
        spec:
          containers:
            - name: reporting-tool
              image: reporting-tool

          restartPolicy: Never
The representation below indicates what each part of the cron schedule represents :
 ┌───────────── minute (0 - 59)
 │ ┌───────────── hour (0 - 23)
 │ │ ┌───────────── day of the month (1 - 31)
 │ │ │ ┌───────────── month (1 - 12)
 │ │ │ │ ┌───────────── day of the week (0 - 6) (Sunday to Saturday)
 │ │ │ │ │                                   OR sun, mon, tue, wed, thu, fri, sat
 │ │ │ │ │
 │ │ │ │ │
 * * * * *
Once is created, you can see the information by getting the CronJob :
marijan$ kubectl get cronjobs

NAME                 SCHEDULE    TIMEZONE   SUSPEND   ACTIVE   LAST SCHEDULE   AGE
reporting-cron-job   * * * * *   <none>     False     0        <none>          7s
Service & Network
Services in Kubernetes are used to set up connectivity between components within the cluster, such as between back-end and front-end Pods, or to connect to external resources. It's consider as an object such as Deployment, Replicaset, etc.
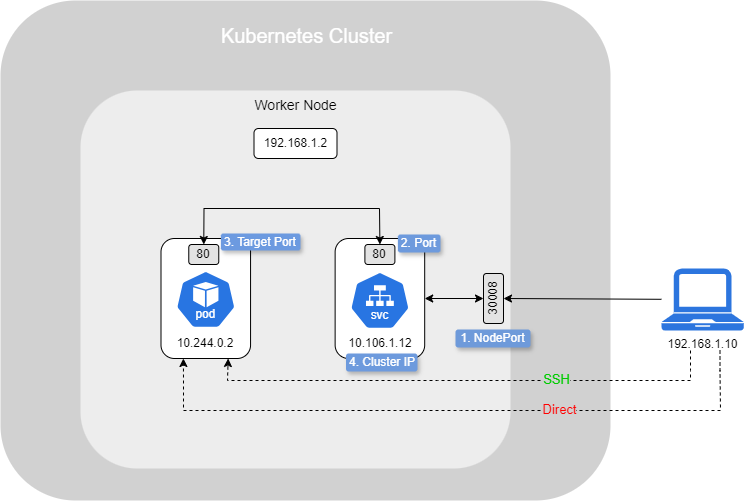
Below is a simple scenario where an external resource try to access a Pod :
By default, the user cannot access directely by trying to reach the IP of the Pod (10.244.0.2), even if he is on the same network as the Node (192.168.1.0). Indeed, the Pod is inside the Node. However, he can reach it by SSH through the Node as he has an access to the Pod network (10.244.0.0).
However, is not that we really want, instead of use SSH, setting up a Service :
- NodePort : To allow connections from outside, we will set up a NodePort, which is a port open on the Node and forwards traffic directly to the Service. A NodePort is, by default, assigned within the range 30,000 to 32,767. In this example, it is set to 30,008.
- Port : The request is then forwarded to the Service Port, which is the default port that receives traffic from NodePort 30008.
- TargetPort : After that, the request is forwarded to the Pod on the port where the actual service is running (in this case, port 80).
- Cluster IP : This is the IP address assigned to the Service, known as the Cluster IP, which is 10.106.1.12.
All of this information is from the perspective of the Service. Here is an example configuration related to the scenario above :
marijan$ cat service-definition.yaml

apiVersion: v1
kind: Service
metadata:
  name: my-service
spec:
  type: NodePort
  ports:
    - port: 80
      targetPort: 80
      nodePort: 30008
  selector:
    app: myapp
If you don't specify the targetPort, it will default to the same value as the defined port. Additionally, if you don't provide a nodePort, it will automatically assign a random port within the default range (30,000 to 32,767).
To ensure that traffic reaches the correct service on the TargetPort, it's crucial to set the selector correctly. For example, in this configuration, the selector is set to app: myapp, which means it will forward traffic to port 80 of any Pod labeled with app: myapp.
Once the service is created, you can see the informations by running the following command :
marijan$ kubectl get services

NAME         TYPE        CLUSTER-IP     EXTERNAL-IP   PORT(S)        AGE
kubernetes   ClusterIP   10.96.0.1      <none>        443/TCP        130d
my-service   NodePort    10.97.123.89   <none>        80:30008/TCP   89s
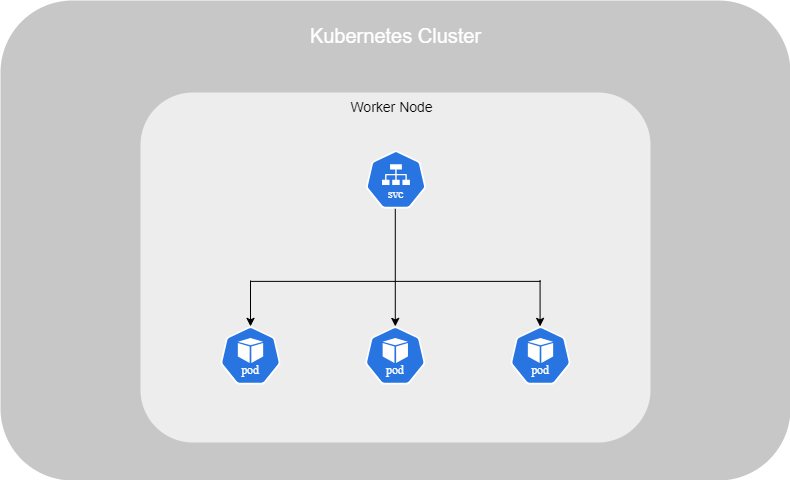
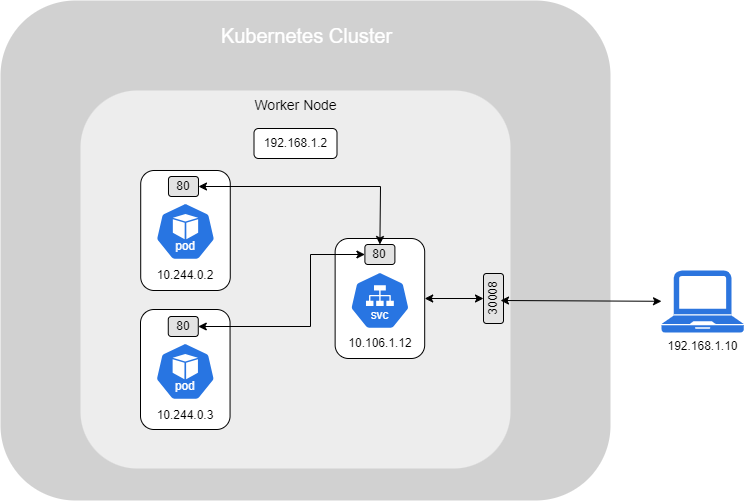
Finally, if you have multiple Pods on a single Node that provide the same service and use the same label and port, the Service will act as a load balancer, distributing traffic between them. Similarly, if you have multiple Pods across multiple Nodes, the Service will still behave as a load balancer, routing traffic to any of the Pods that match the label and port configuration.
Cluster IP
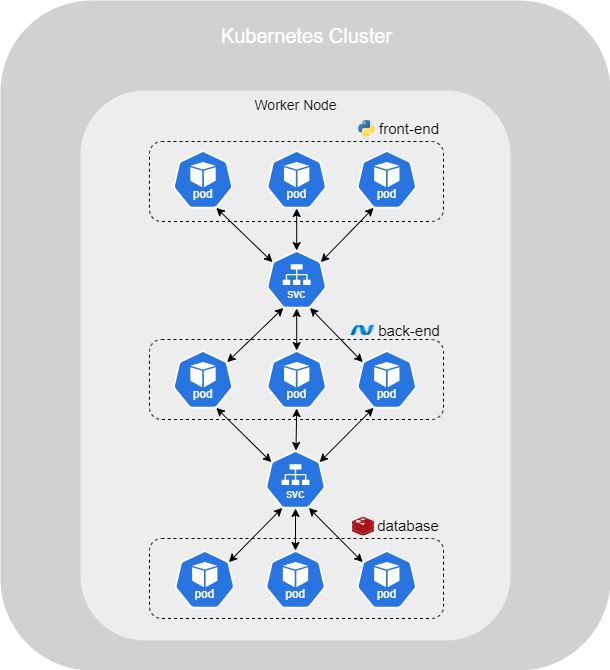
A full stack web application consists of different types of Pods hosting various parts of the application. These include the front-end, back-end, and a database, which is a separate entity connected to the back-end. You may have multiple Pods running, and they need to communicate with each other.
Even though Pods have IP addresses, these addresses are not static. Each time a Pod is destroyed and recreated, a new IP address is assigned. Therefore, you cannot rely on a static IP address for your front-end Pod to communicate with the back-end.
The solution is to use a Service, which groups all related Pods together and provides a single interface to access them, ensuring reliable communication between the components of your application.
As seen previously, to configure this type of setup, you need to define a selector, port, and targetPort for each service and the corresponding Pods. Below is an example of configuration for the back-end :
marijan$ cat service-backend-definition.yaml

apiVersion: v1
kind: Service
metadata:
  name: back-end
spec:
  type: ClusterIP
  ports:
    - port: 80
      targetPort: 80
  selector:
    app: myapp
    type: back-end
Additionally, we have specified the type as ClusterIP. If you want to use this type of configuration, you don't need to explicitly define it, as it will automatically default to a ClusterIP service.
Network Policy
To understand how Network Policies work, it's important to understand the concepts of Ingress and Egress traffic.
For example, for a web server, Ingress traffic refers to incoming traffic from users, while Egress traffic refers to outgoing traffic, such as requests to an API server. These terms depend on the point of view. In this case, we are talking about the web server, but from the perspective of the API server, Ingress would be the traffic coming from the web server, and Egress would be the outgoing traffic to the database.
Then, by default, all Pods in a Kubernetes cluster can communicate with each other, regardless of which Node they are running on. It's as if they are all part of a virtual network where communication is unrestricted.
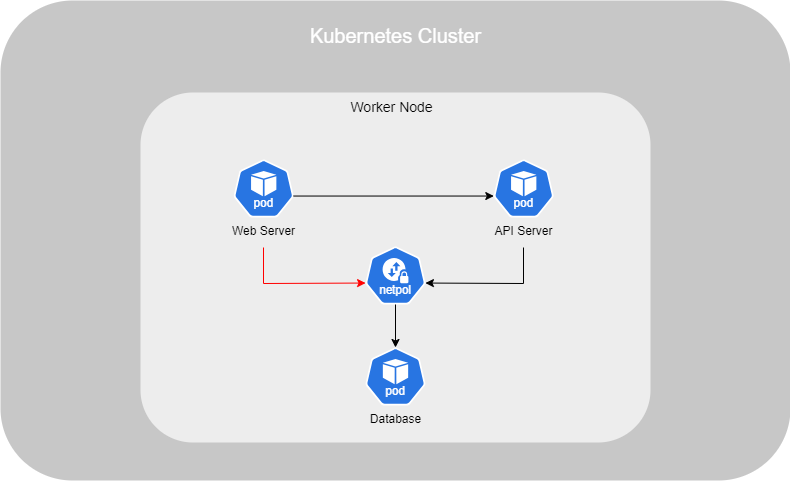
However, in a scenario where you have a web server, an API server, and a database, you may want to restrict access so that the database is only accessible from the API server and not from the web server. To achieve this, you would implement a Network Policy to enforce these access restrictions.
A Network Policy is an object similar to ReplicaSets, Deployments, etc., and it works with Selectors to define which Pods it is associated with, as well as to specify Ingress and Egress rules.
In the example above, Ingress traffic to the database from the web server is restricted. Only Ingress traffic from the API server is authorised. Below is the configuration of the Network Policy object :
marijan$ cat networkpolicy-definition.yaml

apiVersion: networking.k8s.io/v1
kind: NetworkPolicy
metadata:
  name: db-policy
spec:
  PodSelector:
    matchLabels:
      role: db
    policyTypes:
    - Ingress
    ingress
    - from:
      - podSelector:
          matchLabels:
            name: api-pod
      ports:
      -  protocol: TCP
         port 3306
The first podSelector is used to target the Pods with the label that designates their role as a database. Next, we define the policyTypes, which in this case is set to Ingress. The Ingress rules specify which Pods are allowed to access the selected database Pods based on the defined podSelector. Finally, we specify the open port that the selected Pods can access, ensuring that only the designated traffic is permitted.
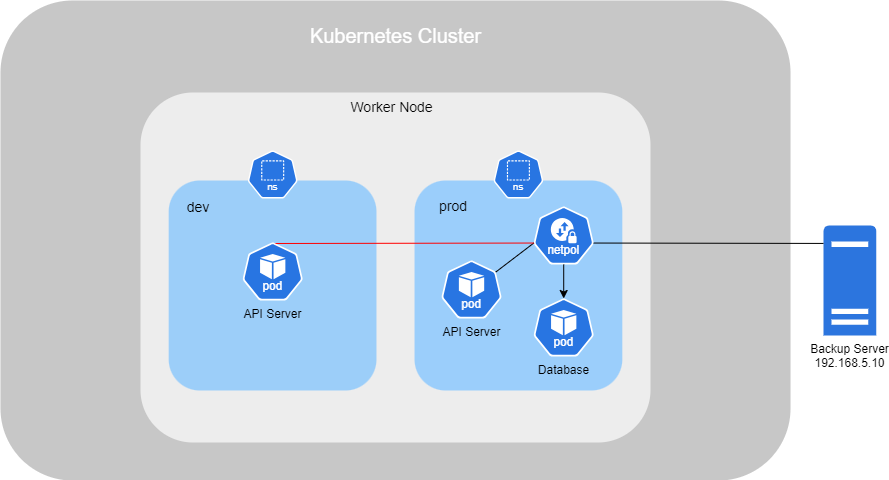
In this scenario bellow, we have an additional namespace that contains a Pod called API Server, and there is also a Backup Server trying to access the database.
In the configuration file, we will add a namespaceSelector that matches the prod namespace. Additionally, we will add an ipBlock with the IP of the Backup Server to allow it access.
marijan$ cat networkpolicy-definition.yaml

apiVersion: networking.k8s.io/v1
kind: NetworkPolicy
metadata:
  name: db-policy
spec:
  PodSelector:
    matchLabels:
      role: db
    policyTypes:
    - Ingress
    ingress
    - from:
      - podSelector:
          matchLabels:
            name: api-pod
        namespaceSelector:
          matchLabels:
            name: prod
      - ipBlock:
          cidr: 192.168.5.10/32
      ports:
      -  protocol: TCP
         port 3306
Each dash ("-") indicates a separate rule, not linked to the others. If I had added a dash before namespaceSelector, it would mean that all Pods within the specified namespace would have access. However, considering the first scenario where the web server is also inside the prod namespace, it would not be a good idea to include the entire namespace, as we want to limit access to specific components like the API server.
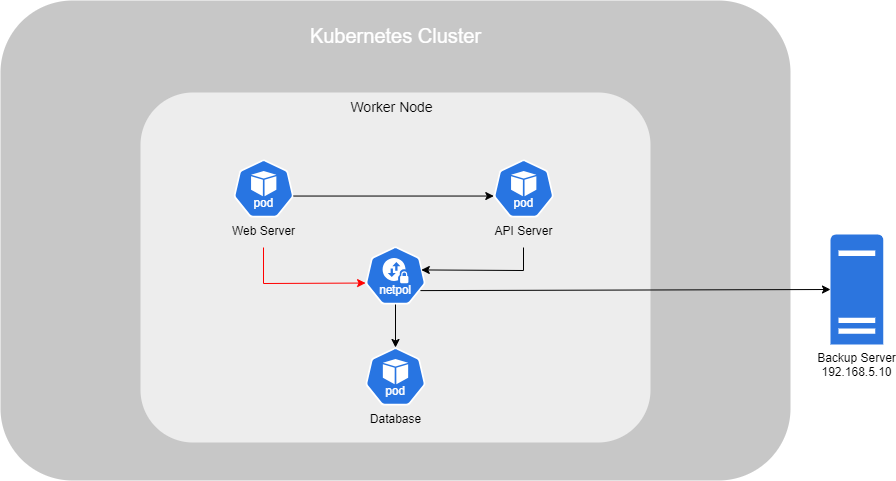
If you need to allow Egress (outgoing requests), simply add "Egress" under the policyTypes section and include an egress section. Instead of using from, use to to define the destination you're trying to reach. In this case, the destination is the Backup Server.
marijan$ cat networkpolicy-definition.yaml

apiVersion: networking.k8s.io/v1
kind: NetworkPolicy
metadata:
  name: db-policy
spec:
  PodSelector:
    matchLabels:
      role: db
    policyTypes:
    - Ingress
    - Egress
    ingress
    - from:
      - podSelector:
          matchLabels:
            name: api-pod
        namespaceSelector:
          matchLabels:
            name: prod
      - ipBlock:
          cidr: 192.168.5.10/32
      ports:
      -  protocol: TCP
         port 3306
    egress
    - to:
      - ipBlock:
          cidr: 192.168.5.10/32
      ports:
      - protocol: TCP
        port: 80
Production Solution
Imagine you have an online store and need to expose it to the internet using Kubernetes.
Self-Hosted Server
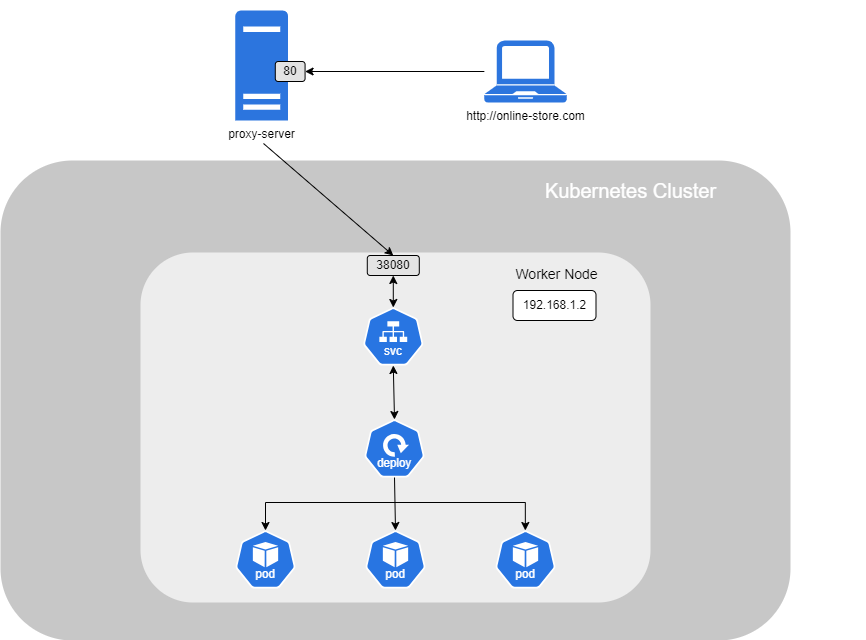
With your website hosted on a Kubernetes cluster, on a self-hosted server, you would need to create a Service that exposes your Deployment, which consists of Pods running behind it on a specific port. You would also set up a proxy server in front of your cluster to redirect traffic from port 80 (HTTP) to a port within the Kubernetes NodePort range (30,000–32,767), as defined in your Service configuration.
Public Cloud
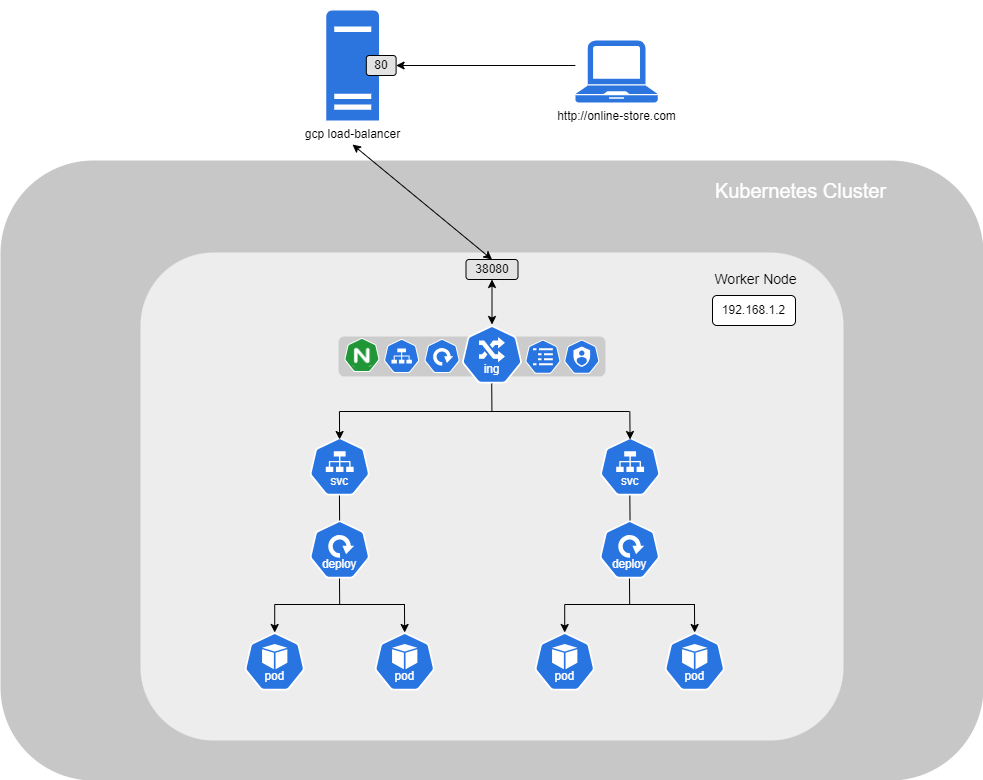
If your website is hosted on a Kubernetes cluster using a public Cloud provider, the configuration will be slightly different. Instead of configuring your Service as a ClusterIP, you would configure it as a LoadBalancer. This will automatically provision a cloud provider's load balancer and link it directly to your Kubernetes Service.
Ingress
When you have many services running in the same Kubernetes cluster that need access to the internet and must be accessible via different URLs, you'll need to set up another load balancer and a proxy server to route traffic to the correct service. Additionally, you'll need to enable SSL for your application so that users can access your site securely via HTTPS. This setup requires a lot of configuration, and developers need to adapt their services accordingly, especially as they scale.
To simplify all of this and manage everything within the Kubernetes cluster, you can use an Ingress.
However, even with an Ingress configuration, you'll still need to set up a Service to allow external access. This could be a LoadBalancer (on a cloud platform) or a ClusterIP Service with a self-hosted proxy. The Ingress controller will handle all the load balancing, SSL authentication, and URL-based routing configurations, ensuring a streamlined process for managing traffic and security for your applications.
In order to do that, you have to setting up a Ingress controller and an Ingress Resources.
Controller
By default, when setting up your Kubernetes cluster, an Ingress Controller is not configured, so you must deploy one. There are many Controllers supported by Kubernetes, and in this example, we will use NGINX.
To install NGINX Ingress Controller, follow these steps :
1. First, you need to install Helm. Here are the steps for Debian :
marijan$ curl https://baltocdn.com/helm/signing.asc | gpg --dearmor | sudo tee /usr/share/keyrings/helm.gpg > /dev/null
marijan$ sudo apt-get install apt-transport-https --yes
marijan$ echo "deb [arch=$(dpkg --print-architecture) signed-by=/usr/share/keyrings/helm.gpg] https://baltocdn.com/helm/stable/debian/ all main" | sudo tee /etc/apt/sources.list.d/helm-stable-debian.list
marijan$ apt-get update
marijan$ apt-get install helm
2. Next, execute the following command to deploy the NGINX Ingress Controller :
marijan$ helm upgrade --install ingress-nginx ingress-nginx \
  --repo https://kubernetes.github.io/ingress-nginx \
  --namespace ingress-nginx --create-namespace
3. A new namespace will be created, along with the deployment and service. You can verify it by running :
marijan$ kubectl get all --namespace=ingress-nginx
NAME                                           READY   STATUS    RESTARTS   AGE
pod/ingress-nginx-controller-d49697d5f-74846   1/1     Running   0          35h

NAME                                         TYPE           CLUSTER-IP       EXTERNAL-IP   PORT(S)                      AGE
service/ingress-nginx-controller             LoadBalancer   10.98.157.94     <pending>     80:30551/TCP,443:32587/TCP   35h
service/ingress-nginx-controller-admission   ClusterIP      10.106.93.95     <none>        443/TCP                      35h

NAME                                       READY   UP-TO-DATE   AVAILABLE   AGE
deployment.apps/ingress-nginx-controller   1/1     1            1           35h

NAME                                                 DESIRED   CURRENT   READY   AGE
replicaset.apps/ingress-nginx-controller-d49697d5f   1         1         1       35h
Resources
Now that you have set up the controller, you need to configure Ingress resources. An Ingress resource is a set of rules and configurations applied to the controller, determining how incoming traffic is routed to the backend services. For example, if you have two websites and want to route traffic from a specific domain to a particular Pod, you can configure the Ingress resource to handle this routing.
The creation of a resource is like any other object in Kubernetes, you have to defined it on a .yaml file. Here is an example :
apiVersion: networking.k8s.io/v1
kind: Ingress
metadata:
  creationTimestamp: "2024-10-20T22:07:44Z"
  generation: 2
  name: demo-localhost
  namespace: default
  resourceVersion: "71769"
  uid: 60fd0964-f992-4ca8-93d3-a01d34faa2f8
spec:
  ingressClassName: nginx
  rules:
  - host: marijan.testdomaine.ch
    http:
      paths:
      - backend:
          service:
            name: demo
            port:
              number: 80
        path: /
        pathType: Prefix
If you have a website with two different sections, such as my-online-store.com, and you want to route traffic to /first and /second, here is an example of the configuration :
apiVersion: networking.k8s.io/v1
kind: Ingress
metadata:
  creationTimestamp: "2024-10-20T22:07:44Z"
  generation: 2
  name: demo-localhost
  namespace: default
  resourceVersion: "71769"
  uid: 60fd0964-f992-4ca8-93d3-a01d34faa2f8
spec:
  ingressClassName: nginx
  rules:
  - host: marijan.testdomaine.ch
    http:
      paths:
      - path: /first
        backend:
          service:
            name: demo-first
            port:
              number: 80
      - path: /second
        backend:
          service:
            name: demo-second
            port:
              number: 80
You can also create a new ressource directly by command :
marijan$ kubectl create ingress --rule="<host>/<path>=<service>:<port>"
But, don't forget to deploy your service, and expose it with the following command. This will automatically created a service :
marijan$ kubectl expose deployment demo
Annotations
You can add several options to your Ingress deployment under the annotations section. This is useful when you need to apply specific configurations.
For more information, refer to the documentation on your Ingress Controller's provider.
Volumes
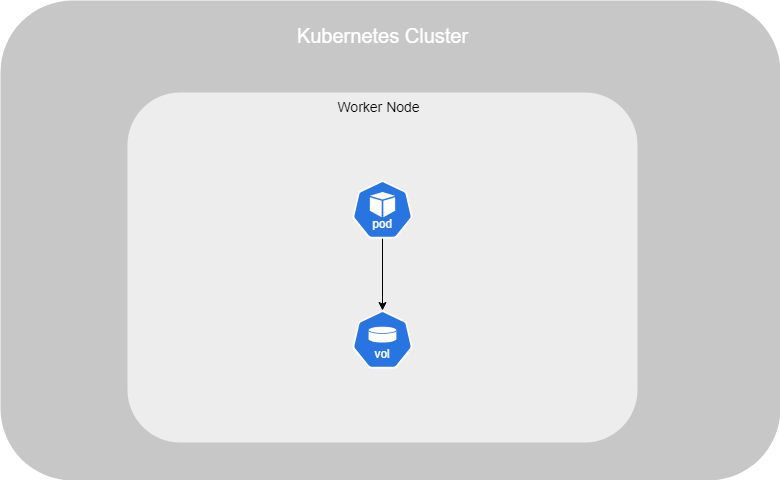
In Kubernetes, just like in Docker, data stored within a Pod is ephemeral and is lost once the Pod is terminated. To ensure data persistence, you need to attach a volume to the container running within the Pod.
When a volume is attached and a Pod is created, any data stored in that volume remains even if the Pod is deleted, ensuring data persistence.
Here is an example of an attached volume :
marijan$ cat volume-definition.yml

apiVersion: v1
kind: Pod
metadata:
    name: random-number-generator
spec:
    containers:
    - name: alpine
      image: alpine
      command: ["/bin/sh","-c"]
      args: ["shuf -i 0-100 -n 1 >> /opt/number.out;"]
      volumeMounts
      - mountPath: /opt
        name: data-volume

    volumes:
    - name: data-volume
      hostPath:
         path: /data
         type: Directory
In the example above, we have created a Pod using an Alpine image as the container. A command has been set up to create a file with a random number between 0 and 100, which is stored at /opt/number.out.
To make the data persistent, we added a volume, specifying both its name and the path where files created in the container will be stored.
Next, we defined the volumeMounts option, where we specified the mount path inside the container and referenced the volume by its name.
To summarise, the number.out file will be stored in the /opt directory within the container, which is actually backed by the /data directory of the attached volume. Even if the Pod is deleted, the file will persist on the host through this volume.
However, this solution works only if your application is running on a single Node. In a multi-node cluster, each Node has its own /data directory, and the volume will not know which specific Node's directory to use.
To overcome this limitation, you can use an external, replicated storage solution. Kubernetes supports various types of persistent storage options such as NFS (Network File System), GlusterFS, and others. Additionally, public cloud providers offer integrated solutions like AWS EBS (Elastic Block Store), Azure Disk, and Google Cloud Persistent Disks, which ensure data is available across multiple nodes.
Persistent Volume
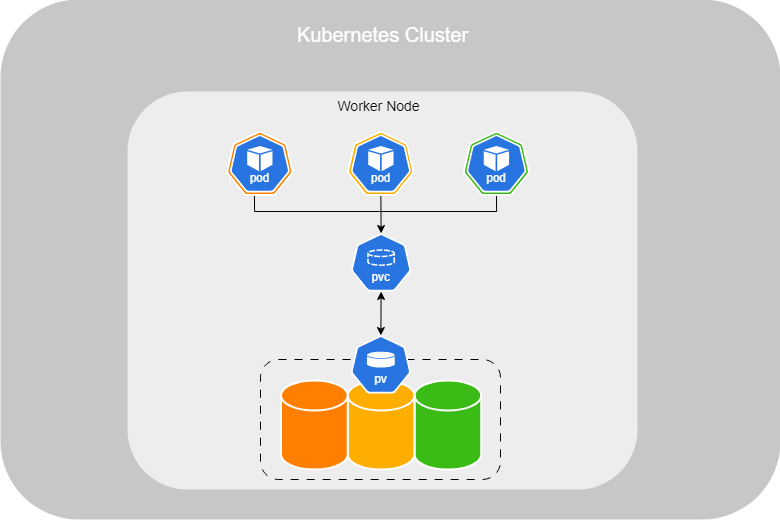
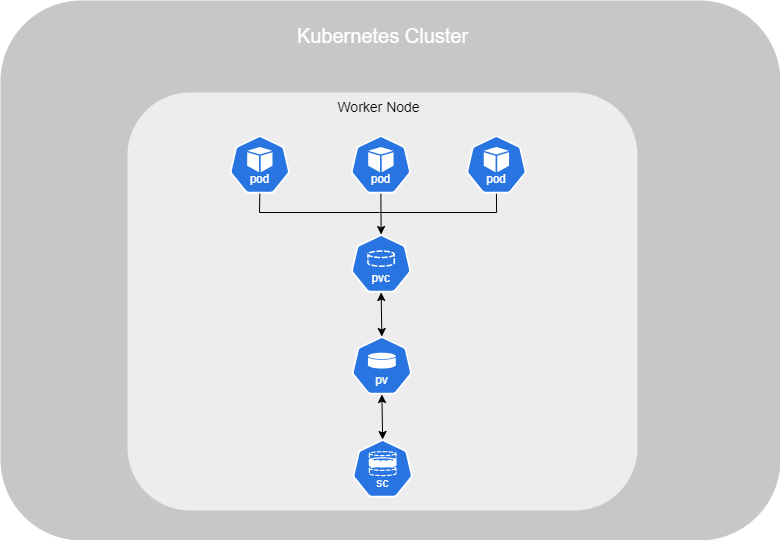
In a large environment with many users deploying many Pods, users often need to configure storage for their applications. To simplify storage management for administrators, you should deploy Persistent Volume (PV) objects, regardless of the replicated storage solution in use.
As an administrator, you can provide a pool of storage resources, and users can request a portion of it as needed through Persistent Volume Claims (PVCs). This approach abstracts the underlying storage and allows users to claim storage without needing to manage the specifics of the storage infrastructure.
Persistent Volumes enable efficient management of storage in dynamic environments, ensuring that storage resources are appropriately allocated and consumed.
marijan$ cat persistent-volume-definition.yaml

apiVersion: v1
kind: PersistentVolume
metadata:
    name: pv-vol1
spec:
    accessModes:
        - ReadWriteOnce
    capacity:
        storage: 1Gi
    hostPath:
        path: /tmp/data
In the example above, we have created a Persistent Volume for users, configured in Read and Write mode, with 1 GiB of available storage. Kubernetes supports three different accessModes :
- ReadWriteOnce : The volume can be mounted as read-write by a single node.
- ReadOnlyMany : The volume can be mounted as read-only by multiple nodes.
- ReadWriteMany : The volume can be mounted as read-write by multiple nodes.
As mentioned earlier, this configuration is not recommended for production environments since it only supports a single node. For production use, you should set up an integrated storage solution that supports multi-node environments and high availability, such as a cloud storage service or a distributed file system.
Persistent Volume Claims
Now that the Persistent Volume (PV) is set up, you can create your Persistent Volume Claims (PVC). Kubernetes will automatically bind the PVC to a suitable PV by checking factors such as sufficient capacity, access modes, volume modes, and storage class.
If there are multiple matching PVs, Kubernetes will select one at random. However, you can use labels and selectors to explicitly bind a PVC to a specific PV.
If no PV matches the PVC’s requirements, the PVC will remain in a pending state.
Here is an example of a configuration, with the exmaple of PV above :
marijan$ cat persistent-volume-claim-definition.yaml

apiVersion: v1
kind: PersistentVolumeClaim
metadata:
    name: myclaim
spec:
    accessModes:
        - ReadWriteOnce
    resources:
        requests:
            storage: 500Mi
Now that both are set up, you can observe the following behavior :
kubectl get pvc
NAME      STATUS   VOLUME    CAPACITY   ACCESS MODES   STORAGECLASS   VOLUMEATTRIBUTESCLASS   AGE
myclaim   Bound    pv-vol1   1Gi        RWO                           <unset>                 3s
If the PVC is deleted, the default behavior is for the PV to be set to Retain, meaning it will continue to exist with the same data and remain available for scheduling. However, you can modify this behavior by adding persistentVolumeReclaimPolicy to your PV configuration :
- Delete : the volume will be automatically deleted once the PVC is deleted ;
- Recycle : data into the volume will be deleted, but the PV will be ready to be schedule again.
You can integrate PVC configuration directly into the configuration file of your Pod, Deployment or ReplicaSet :
marijan$ cat pod-integrate-pvc-definition.yml

apiVersion: v1
kind: Pod
metadata:
    name: random-number-generator
spec:
    containers:
    - name: alpine
      image: alpine
      command: ["/bin/sh","-c"]
      args: ["shuf -i 0-100 -n 1 >> /opt/number.out;"]
      volumeMounts
      - mountPath: /opt
        name: data-volume

    volumes:
    - name: data-volume
      hostPath:
         persistentVolumeClaim:
            claimName: myclaim
Storage Class
By default, when using persistent storage options such as those provided by public cloud providers, you must manually create a disk and then create a PV linked to it. This method is called static provisioning.
However, there is also a method called dynamic provisioning, which works with a StorageClass (SC). StorageClasses are used to automatically provision storage in the cloud and attach it to the Pod once the PVC is created.
Here is an example of configuration of a Storage Class using GCE (Google Cloud) :
marijan$ cat storage-class-definition.yaml

apiVersion: storage.k8s.io/v1
kind: StorageClass
metadata:
    name: google-storage

provisioner: kubernetes.io/gce-pd
Then, you have to add the parameter storageClassName on your PVC configuration file :
marijan$ cat persistent-volume-claim-definition.yaml

apiVersion: v1
kind: PersistentVolumeClaim
metadata:
    name: myclaim
spec:
    accessModes:
        - ReadWriteOnce
    storageClassName: google-storage
    resources:
        requests:
            storage: 500Mi
Stateful Sets
When deploying your application, such as a database, and you require high availability, you'll typically deploy multiple Pods :
- First, your deployment will automatically create three Pods: one master and two slaves.
- The data from the master will be cloned to slave-1.
- Continuous replication will be enabled from the master to slave-1.
- Once slave-1 is ready, the data will be cloned from slave-1 to slave-2.
- Continuous replication will then be enabled from the master to slave-2.
- Finally, the master’s address will be configured on both slaves.
However, by default, Kubernetes does not ensure that all Pods have access to the same data when using a Deployment. It's due to of that an Deployment doesn't defined that which Pod is consider as a master.
To achieve this, you need to set up StatefulSets. StatefulSets assign a unique number to each Pod, with the master typically labeled as 0, and slaves labeled as 1, 2, and so on. You can then define the master’s name in your application configuration, allowing it to be used as a reference by the slaves.
To deploy it, the configuration is similar to a Deployment, but you also need to add a serviceName. This serviceName defines the base name that will be used along with the Pod numbers :
marijan$ cat statefulset-definition.yaml

apiVersion: apps/v1
kind: StatefulSet
metadata:
  name: mysql
  labels:
    app: mysql
spec:
  template:
    metadata:
      labels:
        app: mysql
    spec:
      containers:
      - name: mysql
        image: mysql
  replicas: 3

  selector:
    matchLabels:
      app: mysq
  serviceName: mysql-h
With CoreDNS, the DNS service within a Kubernetes cluster, it can now resolve the following Pods :
mysql-0.mysql-h.default.svc.cluster.local
mysql-1.mysql-h.default.svc.cluster.local
mysql-2.mysql-h.default.svc.cluster.local
However, even if we have created a StatefulSet to ensure data from the master is shared with the slaves, Kubernetes doesn't automatically know where to schedule data to the Pods by their name. This is why we implement a Headless Service, which helps direct traffic to the correct Pods by providing DNS resolution without load balancing.
marijan$ cat headless-service-definition.yaml

apiVersion: v1
kind: Service
metadata:
  name: mysql-h
spec:
  ports:
  - port: 3306
  selector:
    app: mysql
  clusterIP: None
A headless service is a normal service, but with the clusterIP set to None. With a StatefulSet, Kubernetes automatically knows that an application labeled mysql should be directed to the appropriate Pod instances (0, 1, or 2).
You can achieve a similar configuration without a StatefulSet, but only for a single Pod. If you try to apply this configuration to a Deployment, multiple Pods with the same name will exist, which can lead to conflicts.
Finally, you can use Persistent Volume Claims (PVCs) for your Pods running in a StatefulSet by specifying the volume path followed by the PVC. However, this configuration would typically result in using a single PVC for all existing replicas.
In this case, we want to ensure that each Pod has its own PVC.
marijan$ cat statefulset-pvc-definition.yaml

apiVersion: apps/v1
kind: StatefulSet
metadata:
  name: mysql
  labels:
    app: mysql
spec:
  template:
    metadata:
      labels:
        app: mysql
    spec:
      containers:
      - name: mysql
        image: mysql
      volumeMounts:
      - mountPath: /var/lib/mysql
        name: data-volume

  volumeClaimTemplates:
  - metadata:
      name: data-volume
    spec:
      accessModes:
        - ReadWriteOnce
      storageClasseName: google-storage
    ressources:
      requests:
        storage: 500Mi

  replicas: 3

  selector:
    matchLabels:
      app: mysq
  serviceName: mysql-h
Here, we have integrated all of the PVC configuration directly into the StatefulSet configuration, including the resources, access modes, and storage class names.
Security
This section deals with Security in Kubernetes which can be found in many aspects.
Context
When you deploy a Pod, a user with the default rights set by Kubernetes is created. However, you can change it and define new rights, called capabilities, for the entire Pod or only for a specific container running inside a Pod.
Below, we have created a new user for all Pods :
marijan$ cat securitycontextpod_definition.yaml

apiVersion: v1
kind: Pod
metadata:
  name: <name-pod>
spec:
  securityContext:
    runAsUser: <id>
  containers:
  - name: <name-container>
    image: <image>
We have added the securityContext section with a user ID. Here, the rights defined for this user will apply to all containers running in the Pod, setting these rights for all of them.
You can also define a user and rights only for a specific container. Here is an example below :
marijan$ securitycontextcontainer_definition.yaml

apiVersion: v1
kind: Pod
metadata:
  name: <name-pod>
spec:
  containers:
  - name: <name-container>
    image: <image>
    securityContext:
      runAsUser: <id>
      capabilities:
            add: ["<capabilites>"]
In this example, the securityContext is defined within the container specification, setting a user ID specifically for that container. Capabilites stands for the rights that the user defined is able to do. If you set rights on containers, they will overwrite the rights of pods.
To know get the information about the user defined for the pod, you can run the following command :
marijan$ kubectl exec pod <name> -- whoiam
Manifest Secret
Related to the section Manifest file (YAML) - Environnement Variables - Secret
Secret Store CSI Driver
All of the information stored in a Secret file is not encrypted but encoded. So, if you decide to upload your project on GitHub and you simply encoded your password by using a Secret, it can be easily decoded. A good practice is to use a Secret Store CSI Driver, which is available on cloud platforms such as AWS, Google Cloud, or Azure.
In the example above, let's say our credentials is stored in the AWS Secrets Manager. The SecretProviderClass will indicate the provider and the object name we are trying to access. Then, the CSI driver will check what the Pod is requesting and will ask the provider to retrieve the information. Finally, when the CSI driver receives the information, it will create a volume with the retrieved data. The CSI driver is managed by Kubelet.
Encryption
To secure your password in Kubernetes using a secret file, you can add encryption features to your API server. To do this, follow the instructions below :
Note : If you have multiple worker nodes, it should be set up on all of them.
1. First, set up your encryption configuration file. There are several types of encryption available. Here is an example :
marijan$ cat enc.yaml

apiVersion: apiserver.config.k8s.io/v1
kind: EncryptionConfiguration
resources:
  - resources:
      - secrets
      - configmaps
      - pandas.awesome.bears.example
    providers:
      - aescbc:
          keys:
            - name: key1
              secret: <BASE 64 ENCODED SECRET>
      - identity: {}
- Identity {} : This type of encryption is used for debugging, transition, or performance purposes because it does not actually encrypt data. This fallback allows reading unencrypted secrets in case we do not encrypting all of secrets data.
- Key : You need to add each key that you want to encrypt, encoded in base64.
2. Now, to check if the encryption feature is avaible on the Node, run the following command :
marijan$ ps -aux | grep kube-api | grep "encryption-provider-config"
3. If it's not, you have to add the encryption features on the manifest for the kube-apiserver static pod :
marijan$ cat /etc/kubernetes/manifests/kube-apiserver.yaml

apiVersion: v1
kind: Pod
metadata:
  annotations:
    kubeadm.kubernetes.io/kube-apiserver.advertise-address.endpoint: 10.20.30.40:443
  creationTimestamp: null
  labels:
    app.kubernetes.io/component: kube-apiserver
    tier: control-plane
  name: kube-apiserver
  namespace: kube-system
spec:
  containers:
  - command:
    - kube-apiserver
    ...
    - --encryption-provider-config=/etc/kubernetes/enc/enc.yaml  # add this line
    volumeMounts:
    ...
    - name: enc                           # add this line
      mountPath: /etc/kubernetes/enc      # add this line
      readOnly: true                      # add this line
    ...
  volumes:
  ...
  - name: enc                             # add this line
    hostPath:                             # add this line
      path: /etc/kubernetes/enc           # add this line
      type: DirectoryOrCreate             # add this line
  ...
- --encryption-provider-config=/etc/kubernetes/enc/enc.yaml : This command enables encryption by specifying the path to the encryption configuration file.
- volumeMounts : Once encryption is enabled, Kubernetes will automatically mount this volume on each new Pod that contains encrypted secret data.
- volume : Here you specify the location of your encryption configuration file in YAML format.
4. The API server on the worker node will restart. Once it is done, install the etcdctl package to verify that the encryption has been successfully applied :
marijan$ apt-get install etcdctl
...

marijan$ ETCDCTL_API=3 etcdctl \
   --cacert=/etc/kubernetes/pki/etcd/ca.crt   \
   --cert=/etc/kubernetes/pki/etcd/server.crt \
   --key=/etc/kubernetes/pki/etcd/server.key  \
   get /registry/secrets/default/<secret-file> | hexdump -C

00000000  2f 72 65 67 69 73 74 72  79 2f 73 65 63 72 65 74  |/registry/secret|
00000010  73 2f 64 65 66 61 75 6c  74 2f 73 65 63 72 65 74  |s/default/secret|
00000020  31 0a 6b 38 73 3a 65 6e  63 3a 61 65 73 63 62 63  |1.k8s:enc:aescbc|
00000030  3a 76 31 3a 6b 65 79 31  3a c7 6c e7 d3 09 bc 06  |:v1:key1:.l.....|
00000040  25 51 91 e4 e0 6c e5 b1  4d 7a 8b 3d b9 c2 7c 6e  |%Q...l..Mz.=..|n|
00000050  b4 79 df 05 28 ae 0d 8e  5f 35 13 2c c0 18 99 3e  |.y..(..._5.,...>|
[...]
00000110  23 3a 0d fc 28 ca 48 2d  6b 2d 46 cc 72 0b 70 4c  |#:..(.H-k-F.r.pL|
00000120  a5 fc 35 43 12 4e 60 ef  bf 6f fe cf df 0b ad 1f  |..5C.N`..o......|
00000130  82 c4 88 53 02 da 3e 66  ff 0a                    |...S..>f..|
0000013a
Accounts
Accounts in Kubernetes are used to ensure the security around the cluster with setting up permission for user and service.
User
A user account is used by a human and can be for an administrator accessing the cluster to perform administrative tasks or for a developer needing access to the cluster to deploy applications.
Auth Mechanisms
When you send a request to the cluster, the kube-apiserver authenticates the user and processes the request.
Creating a user in Kubernetes differs from other objects; you can't create a user through a command or .yaml file. There are different authentication mechanisms that the kube-apiserver supports :
- Static Password File : A file containing the username, user ID, and password.
- Static Token File : A file containing the username and a token used as a password.
- Identity Service : A third-party authentication protocol (such as Kerberos).
- Certificates : Uses client certificates for authentication.
Basic (not recommanded)
To configure static password or token authentication, you can create a .csv file containing the necessary user information. Here is an example :
marijan$ cat user-details.csv

password123,user1,u0001
password123,user2,u0002
password123,user3,u0003
Then, you will modify the kube-apiserver.service file and add --basic-auth-file=user-details.csv :
marijan$ vim /etc/kubernetes/manifests/kube-apiserver.yaml

...
spec:
  containers:
  - command:
    - kube-apiserver
    - --advertise-address=172.16.0.10
    - --allow-privileged=true
...
    - --service-cluster-ip-range=10.96.0.0/12
    - --tls-cert-file=/etc/kubernetes/pki/apiserver.crt
    - --tls-private-key-file=/etc/kubernetes/pki/apiserver.key
    - --basic-auth-file=user-details.csv
To authenticate with the kube-apiserver using a static password file, include the username and password in your command. Here’s an example :
marijan$ curl -v -k https://master-node-ip:6443/api/v1/pods -u "user1:password123"
For the token, is pretty much the same, but instead of the password, you have to set the token :
marijan$ cat user-token-details.csv

pldmVdPWYcJzaIlJT7D16aIxmwPPz5bgVQmh5Zv6yWvOXZ4HCROke5YtZl6rLM7E,user1,u0001
jWtICIxOtiU0uLlaWb7IqaI79XjMoyWHya5CrSPxY9reDdyI5SkgmLe6fiaIfGIx,user2,u0002
jWtICIxOtiU0uLlaWb7IqaI79XjMoyWHya5CrSPxY9reDdyI5SkgmLe6fiaIfGIx,user3,u0003
KubeConfig (certificates)
By default, when you interact with a Kubernetes cluster for example, to get information about a Pod you don’t need to specify connection details. This is because the interaction is automatically linked to a KubeConfig file, which contains essential information such as :
- --server my-kube-playground:6443 : the cluster’s server address.
- --client-key admin.key : the client’s private key.
- --client-certificate admin.crt : the client’s certificate.
- --certificate-authority ca.crt : the certificate authority used to verify the server’s certificate.
The KubeConfig file is organised into three main sections: Clusters, Contexts, and Users. To connect a specific User to a Cluster, a Context is needed to bridge them. The Context defines which User has access to which Cluster. Here is an example :
marijan$ cat kubeconfig.yaml

apiVersion: v1
kind: Config

clusters:
- name: default-cluster
  cluster:
    certificate-authority: ca.crt
    server: https://default-cluster-ip:6443

contexts:
- name: admin@default-cluster
  context:
    cluster: default-cluster
    user: admin

users:
- name: admin
  user:
    client-certificate: admin.crt
    client-key: admin.key
In the example above, we have permitted the user from the Worker Node to execute commands on the default-cluster. We also created a ConfigMap file containing all the relevant information. To view the current configuration, you can run the following command :
marijan$ kubectl config view

apiVersion: v1
clusters:
- cluster:
    certificate-authority-data: DATA+OMITTED
    server: https://default-cluster-ip:6443
  name: default-cluster
contexts:
- context:
    cluster: default-cluster
    namespace: default
    user: admin
  name: default-context
current-context: default-context
kind: Config
preferences: {}
users:
- name: admin
  user:
    client-certificate: admin.crt
    client-key: admin.key
You can add multiple users, contexts, and clusters to enable a Worker Node to access multiple clusters. To do this, simply add the necessary configurations to the KubeConfig file. To be more specific, you can also specify the namespace in the KubeConfig file to restrict the user's access to a particular namespace.
Another option is to set all of this information (certificates, admin.key, etc.) in a kubectl proxy. This allows you to avoid specifying details or setting up a KubeConfig file. However, it’s important to note that a kubectl proxy is not the same as a kube-proxy.
Service
A service account is used by an application and needs access to the cluster to, for instance, collect information or deploy other applications.
For instance, if you have an application such as Prometheus running to monitor the system, it needs access to the Kubernetes API of the cluster to collect data and display it. To access the API of the cluster, it requires a service account with the sufficient permissions.
To create a service account, run the following command :
marijan$ kubectl create serviceaccount <name>
Once it is created, you should set up a token for it if you want your Service Account to be able to interact with the API. Since version 1.24, Kubernetes doesn't generate the token automatically. You have to set it up yourself.
The token is stored in a secret file linked to the service account :
marijan$ cat token-sa-definition.yml

apiVersion: v1
kind: Secret
type: kubernetes.io/service-account-token
metadata:
  name: <name>
  annotations:
    kubernetes.io/service-account.name: "<name>"

marijan$ kubectl create -f token-sa-definition.yml
Here, we have just specify the name of our Service Account and create it. Now, if you describe the SA, you will see the token :
marijan$ kubectl describe sa <name>
Name:                <name>
Namespace:           default
Labels:              <none>
Annotations:         <none>
Image pull secrets:  <none>
Mountable secrets:   <none>
Tokens:              <name-token>
Events:              <none>
If you describe the secret file created for this service account, you will see the token ID :
marijan$ kubectl describe secret <name>
Name:         <name>
Namespace:    default
Labels:       <none>
Annotations:  kubernetes.io/service-account.name: <name>
              kubernetes.io/service-account.uid: 06290034-9fa7-4870-a38e-284b9ae35642

Type:  kubernetes.io/service-account-token

Data
====
ca.crt:     1107 bytes
namespace:  7 bytes
token:      eyJhbGciOiJSUzI1NiIsImtpZCI6ImpJcG50MWhkUjY0bTFNTi1YRzdPTU05TldDVFBlc3RDV3NBdXNzUFc2UTgifQ.eyJpc3MiOiJrdWJlcm5ldGVzL3NlcnZpY2VhY2NvdW50Iiwia3ViZXJuZXRlcy5pby9zZXJ2aWNlYWNjb3VudC9uYW1lc3BhY2UiOiJkZWZhdWx0Iiwia3ViZXJuZXRlcy5pby9zZXJ2aWNlYWNjb3VudC9zZWNyZXQubmFtZSI6InRlc3QiLCJrdWJlcm5ldGVzLmlvL3NlcnZpY2VhY2NvdW50L3NlcnZpY2UtYWNjb3VudC5uYW1lIjoidGVzdCIsImt1YmVybmV0ZXMuaW8vc2VydmljZWFjY291bnQvc2VydmljZS1hY2NvdW50LnVpZCI6IjA2MjkwMDM0LTlmYTctNDg3MC1hMzhlLTI4NGI5YWUzNTY0MiIsInN1YiI6InN5c3RlbTpzZXJ2aWNlYWNjb3VudDpkZWZhdWx0OnRlc3QifQ.DKIo1a8-cef1jnndGCmz-koBEf1nf11pDRlQL_uI7-fnTikwb3YSRhsJ15ipXD0DiSrJdgD-wdM358k1LZ-ec5fuF8b3g7-f9hdihgDJVJWrG-6auG0tHoC78EQfo5v30TULuD_T8tXKc9ZEk26Ijcau8OI62Aw2nqSAT-oVgWf6hWZTu22F4HISiuWILZyyL0FbPJOZZfIj7seDQIh9lUnvtU3jYbTCEIhV_A52IdkWXV1rKl7HS3b6TkGq2yTIACSQu79kVKd9D_CsL4kSivLZazTgsDwpgDRGG9zBLIzmNaR-z0-akbWfTNsRkQOnOyjwoSs4rP-tydIj3Hbc7g
This token is usually set in the application to which we would like to grant access to the API.
A good way to save time when setting up a token for API access for an application is to mount this token in a volume on the Pod.
Here, we have generated a un Service Account with his token stored in a secret file. This token has some access on the API that we have defined. To avoid to have to setting up on the application directly, we have mounted a volume where the information related to the Service Account are set.
Default
There exists a default Service Account named Default. When you set up a new Pod, it automatically creates a volume with its token to communicate with the API server. The Default Service Account has very low rights with the API server, which is why it is automatically linked to new Pods.
If you don't want a token to be created by default, you need to specify the following line in the configuration of your Pod under the spec section :
marijan$ cat pod-definition.yml

apiVersion: v1
kind: Pod
metadata:
    name: myapp-pod
    labels:
        app: myapp
        type: front-end
spec:
    containers:
        - name: nginx-container
          image: nginx
    automountServiceAccountToken: false # add this line
On the other hand, if you want to configure a specific service account, you just add the following line, specifying the name of your Service Account :
marijan$ cat pod-definition.yml

apiVersion: v1
kind: Pod
metadata:
    name: myapp-pod
    labels:
        app: myapp
        type: front-end
spec:
    containers:
        - name: nginx-container
          image: nginx
    ServiceAccountName: <name> # add this line
API
The core of Kubernetes control plane is the API server. When you perform actions on a Kubernetes cluster, you are interacting with the API server, either through the kubectl command or via REST API calls.
Groups
The API is organised into several key groups:
- /api : The core API group, containing fundamental resources like namespaces, pods, replication controllers (RC), and more.
- /apis : The named API group, which includes various resources for apps, extensions, networking, and other modules.
- /version : Provides information on the Kubernetes cluster version.
- /metrics : Used for monitoring cluster resource usage.
- /healthz : Monitors the health status of the cluster.
- /logs : Provides logs for third-party applications.
Version
When a new object or feature is developed by Kubernetes, it goes through three distinct stages before it becomes fully stable :
- /v1alpha : This API group is not enabled by default and must be explicitly specified to use it. It may contain several bugs, making it useful primarily for users who want to provide early feedback on new features. There’s no guarantee that it will become generally available.
- /v1beta : This API group is available by default and is generally stable but may have minor bugs. Kubernetes maintains it with the goal of eventually supporting it as a stable version. It's intended for users interested in beta testing and providing feedback on the upcoming stable features.
- /v1 (GA/stable) : This is the stable, generally available version for all users. It is regularly updated by Kubernetes and is highly reliable, making it suitable for production use.
When you run a command such as kubectl get deployment, Kubernetes uses the preferred API version for the specified resource. You can check the API version used by running the following command :
marijan$ kubectl explain deployment

GROUP:      apps
KIND:       Deployment
VERSION:    v1
This command provides details about the Deployment resource, including the API version currently in use.
If needed, you can enable or disable specific API versions by modifying the kube-apiserver.yaml file on your cluster. In this file, you can specify which API versions should be active.
Example of enabling/disabling API versions in kube-apiserver.yaml :
spec:
  containers:
  - command:
    - kube-apiserver
...
    - --runtime-config=api/all
...
To see the prefered version for a API Group, you can check by running the following command :
marijan$ kubectl proxy 8001&

Starting to serve on 127.0.0.1:8001

curl localhost:8001/apis/authorization.k8s.io

{
  "kind": "APIGroup",
  "apiVersion": "v1",
  "name": "authorization.k8s.io",
  "versions": [
    {
      "groupVersion": "authorization.k8s.io/v1",
      "version": "v1"
    }
  ],
  "preferredVersion": {
    "groupVersion": "authorization.k8s.io/v1",
    "version": "v1"
  }
Deprecations
A single API group in Kubernetes can support multiple versions simultaneously. To understand why, how many versions, and for how long they should be supported, it's essential to understand how API deprecation works in Kubernetes.
Lifecycle of an API Version :
- /v1alpha1 and /v1alpha2 : These are experimental stages. You don’t need multiple releases to validate them. They serve as a testing ground for new features. If the features work well and feedback is positive, the API can quickly progress to the beta stage.
- /v1beta : Once the alpha stage is validated, the API is upgraded to beta for broader testing and feedback.
- /v1beta1 (Deprecated) and /v1beta2 : As shown in the lifecycle, to achieve a stable version, the API must typically undergo a minimum of 3 releases or approximately 9 months. Here's how it works :
- When you introduce /v1beta2, the existing /v1beta1 will still remain the preferred (or storage) version by default, but /v1beta2 will also be available for use.
- In the following release, /v1beta2 becomes the preferred version, while /v1beta1 is marked as deprecated.
- Once /v1beta2 is fully validated and feedback is incorporated, /v1beta1 is removed entirely, and /v1beta2 prepares for promotion to GA (General Availability) as /v1.
- /v1beta1 (Deprecated) and /v1beta2 : As shown in the lifecycle, to achieve a stable version, the API must typically undergo a minimum of 3 releases or approximately 9 months. Here's how it works :
- /v1 (GA/Stable): Once /v1 is introduced, it becomes the stable and preferred version. However, the previous beta version (/v1beta2) will still be available but marked as deprecated for the next two releases. After this deprecation period, /v1beta2 will be removed, leaving /v1 as the only available and supported version.
- /v2alpha1: When work begins on the next major version (/v2), the lifecycle starts over with /v2alpha1. This follows the same progression. Throughout this process, /v1 remains the preferred and stable version until /v2 is fully stabilised and promoted to GA. Once /v2 is complete, /v1 may be deprecated, but it will remain available for a defined period to ensure a smooth transition for users.
If an object remains in an older API version after upgrading your Kubernetes cluster, you can convert it to a newer version if that version is available. For instance, if your object is using the /v1beta1 API and the /v1 version is supported, you can perform a conversion to migrate the object to the stable /v1 API.
The command kubectl convert is not installed by default when you deploy Kubernetes. You need to install it manually by following the official procedure outlined in the Kubernetes documentation (for Linux system).
After downloading, move the binary to a directory in your PATH, such as /usr/local/bin. Make the binary executable by running :
marijan$ chmod +x kubectl-convert

marijan$ mv kubectl-convert /usr/local/bin/kubectl-convert
Once installed, you can use the kubectl convert command to update resources to a newer API version. For example :
marijan$ kubectl convert -f <old-file.yaml> --output-version <new-api> > <new-file.yaml>

marijan$ kubectl create -f <new-file.yaml>
Authorisation
To restrict access for a user or a service, you need to implement authorisation. This can be achieved using four different mechanisms: Node Authorizer, Attribute-Based Access Control (ABAC), Role-Based Access Control (RBAC), Webhook, AlwaysAllow and AlwaysDeny.
All of these authorisation mechanisms are configured in the kube-apiserver.yaml file. By default, the authorisation mode is set to AlwaysAllow.
spec:
  containers:
  - command:
    - kube-apiserver
    - --advertise-address=172.16.0.10
...
    - --authorization-mode=Node,RBAC
...
Depending on the order specified in the --authorization-mode parameter, the API server will check each authorisation mechanism sequentially. If the first mechanism denies access, the request will be sent to the next one, such as RBAC. This process continues until a mechanism allows the request.
Node Authorizer
To access a Node, you can do so in two ways: as a user using context, or by setting up a Worker Node with the kubelet running on it.
The kubelet connects to the API server to read information on Services, Endpoints, Nodes, and Pods. It can also write updates to Node status, Pod status, and events. The kubelet has a certificate and should be part of the system:node group, which is authorised by the Node Authorizer.
Attribute-Based Access Control
To allow external access to the API, you can set up Attribute-Based Access Control (ABAC). This strategy involves setting permissions for a user or group of users. For example, you can allow a Developer user to view, create, and delete Pods. You do this by configuring a policy file in JSON format :
{"kind": "Policy", "spec": {"user": "dev-user", "namespace": "*", "resource": "pods", "apiGroup": "*"}}
For a group, the same principle applies, but you need to replace user with group in your JSON policy file :
{"kind": "Policy", "spec": {"group": "dev-users", "namespace": "*", "resource": "pods", "apiGroup": "*"}}
To apply this JSON file, you need to add it to your API server. However, this approach can be somewhat challenging to manage, so it’s generally recommended to use Role-Based Access Control (RBAC) instead.
Role-Based Access Control
Role-Based Access Control (RBAC) follows a similar principle to ABAC. However, instead of assigning rules directly to individual users or groups, you create a general role (such as "Developer") and associate all relevant users or group with it.
This way, if you need to add a permission for all developers, you can simply update the general "Developer" role, and the changes will be applied to all users associated with it immediately.
Role and RoleBinding
Role and RoleBinding concerns namespace ressources.
Like any other object in Kubernetes, you need to set up a .yaml file for RBAC. Here is an example :
marijan$ cat role-developer.yaml

apiVersion: rbac.authorization.k8s.io/v1
kind: Role
metadata:
  name: developer
rules:
- apiGroups: [""]
  resources: ["pods"]
  verbs: ["list", "get", "create", "update", "delete"]
We have defined the kind Role to create the new role, and then we have specified the following parameters :
- apiGroups : By default, if left blank, this will select the core group.
- resources : Specifies which resources are involved.
- verbs : Indicates which commands are allowed.
Once the role is created, you need to associate a user with it. To do this, you must create a RoleBinding object :
marijan$ cat rolebinding-developer.yaml

apiVersion: rbac.authorization.k8s.io/v1
kind: RoleBinding
metadata:
  name: devuser-developer-binding
subjects:
- kind: Group
  name: dev-users
  apiGroup: rbac.authorization.k8s.io
roleRef:
  kind: Role
  name: developer
  apiGroup: rbac.authorization.k8s.io
It is divided into two sections :
- subjects : This section specifies the user details.
- roleRef : This section provides information about the role we have created.
You can check if you have sufficient access to the cluster by running the following command :
dev-user-1$ kubectl auth can-i create pod
yes
dev-user-1$ kubectl auth can-i delete nodes
no
If you want to check access for another user, you can specify the parameter --as followed by the user's name:
marijan$ kubectl auth can-i create pod --as dev-user-1
yes
The same applies for the namespace; you can specify the parameter --namespace followed by the namespace name.
The configuration can be made more advanced by restricting access to a specific namespace or only to certain pods in the cluster by adding parameters to the configuration object:
marijan$ cat role-developer.yaml

apiVersion: rbac.authorization.k8s.io/v1
kind: Role
metadata:
  name: developer
  namespace: dev
rules:
- apiGroups: [""]
  resources: ["pods"]
  verbs: ["list", "get", "create", "update", "delete"]
  resourceNames: ["nginx-pod"]
We have added two parameters :
- namespace : Defines the restricted namespace.
- resourceNames : Specifies the names of the pods.
Cluster Role and Cluster RoleBinding
Since Role and RoleBinding are used for resources within a specific namespace, ClusterRole and ClusterRoleBinding are used for resources that are cluster-wide, such as Nodes.
Also, as any other object, you need to set up a .yaml file. Here is an example :
marijan$ cat cluster-role-administrator

apiVersion: rbac.authorization.k8s.io/v1
kind: ClusterRole
metadata:
  name: cluster-administrator
rules:
- apiGroups: [""]
  resources: ["nodes"]
  verbs: ["list", "get", "create", "update", "delete"]
We have defined the kind ClusterRole to create the new c-role, and then we have specified the following parameters :
- apiGroups : By default, if left blank, this will select the core group.
- resources : Specifies which resources are involved.
- verbs : Indicates which commands are allowed.
Once the role is created, you need to associate a user with it. To do this, you must create a ClusterRoleBinding object :
marijan$ cat rolebinding-developer.yaml

apiVersion: rbac.authorization.k8s.io/v1
kind: ClusterRoleBinding
metadata:
  name: cluster-admin-role-binding
subjects:
- kind: Group
  name: c-admin
  apiGroup: rbac.authorization.k8s.io
roleRef:
  kind: ClusterRole
  name: cluster-administrator
  apiGroup: rbac.authorization.k8s.io
It is divided into two sections :
- subjects : This section specifies the user details.
- roleRef : This section provides information about the role we have created.
Webhook, AlwaysAllow and AlwaysDeny
If you need to manage permission mechanisms externally from the cluster, you can set up a Webhook.
For example, Open Policy Agent (OPA) is a third-party tool that can be utilised for this purpose. When a user sends a request to access the Kubernetes cluster, the API server will forward the request to the Open Policy Agent to determine whether the user is allowed access.
Finally, there are AlwaysAllow and AlwaysDeny policies. As their names imply, AlwaysAllow permits all requests, while AlwaysDeny rejects all requests unconditionally.
Admission Controllers
To sum up, when a user uses kubectl, they must be authenticated through a certificate configured in the KubeConfig file.
Additionally, we have implemented restrictions with RBAC (Role-Based Access Control) authorisation for each user or group of users.
If we want to enforce specific policies, such as restricting allowed images, requiring certain labels, or other parameters when setting up a Pod, we can use Admission Controllers to do so.
By default, there are already Admission Controllers in place. For example, if you try to deploy a new Pod in a non-existent namespace, the request is rejected because an Admission Controller checks if the namespace is valid for deployment.
You can modify Admission Controllers by editing the kube-apiserver.yaml file, where you can enable or disable specific features.
marijan$ cat /etc/kubernetes/manifests/kube-apiserver.yaml
...
spec:
  containers:
  - command:
...
    - --enable-admission-plugins=NodeRestriction
    - --disable-admission-plugins=DefaultStorageClass
...
In the example above, you could replace the NamespaceExists Admission Controller with NamespaceAutoProvision, which would automatically create a new namespace if it doesn’t already exist. Many other features are also available to customize Admission Controller behavior.
Mutating and Validating
There are two types of functionalities in an Admission Controller: Mutating and Validating.
Mutating functionality is used to add default values or auto-provision settings to objects being created. For instance, if no StorageClass is specified and you have set a DefaultStorageClass in your admission controllers, the controller will automatically add it. Similarly, if you have enabled NamespaceAutoProvision, the admission controller will automatically create a Namespace if it doesn't already exist before creating the object.
Validating functionality, as the name suggests, is used to validate the creation of objects. For example, if NamespaceAutoProvision is not set, or if a NamespaceExists policy is set, the admission controller will first check if the required namespace exists. If it does not, the creation will be rejected.
Dynamic Admission Controller (Webhook)
By default, Kubernetes offers many built-in features for mutating and validating objects. However, you can create your own custom Admission Controller using a Webhook.
To set this up, you need to configure your Admission Controller with MutatingAdmissionWebhook and ValidatingAdmissionWebhook settings, which include the server information for the webhook.
When a request is sent to the Kubernetes Admission Controllers, it automatically forwards the request details to the webhook in the form of an AdmissionReview JSON payload. This payload includes information such as the user making the request, the operation type, and more. Example of AdmissionReview request JSON :
{
  "kind": "AdmissionReview",
  "apiVersion": "admission.k8s.io/v1",
  "request": {
    "uid": "12345",
    "kind": { "group": "", "version": "v1", "kind": "Pod" },
    "resource": { "group": "", "version": "v1", "resource": "pods" },
    "namespace": "default",
    "operation": "CREATE",
    "userInfo": {
      "username": "admin",
      "uid": "user-1",
      "groups": ["system:authenticated"]
    },
    "object": { ... }
  }
}
The webhook responds with an AdmissionReview response, indicating whether the operation is allowed or denied. Example of AdmissionReview response JSON :
{
  "kind": "AdmissionReview",
  "apiVersion": "admission.k8s.io/v1",
  "response": {
    "uid": "12345",
    "allowed": true,
    "status": {
      "code": 200,
      "message": "Request approved by admission webhook"
    }
  }
}
Once you have created your own, you can deploy it on a Kubernetes cluster as a Deployment, along with a Service to make it accessible.
To direct requests to this webhook, you need to create a ValidatingWebhookConfiguration or MutatingWebhookConfiguration object, depending on your use case :
marijan$ cat validatingwebhookconfiguration.yaml

apiVersion: admissionregistration.k8s.io/v1
kind: ValidatingWebhookConfiguration
metadata:
  name: "pod-policy"
webhooks
- name: "pod-policy"
  clientConfig:
      service:
        namespace: "webhook-namespace"
        name: "webhook-service"
      caBundle: "Ci0s3LM@r.. tLS0K"
  rules:
   - apiGroups:   [""]
     apiVersions: ["v1"]
     operations:  ["CREATE"]
     resources:   ["pods"]
     scope:       "Namespaced"
In this configuration :
- ClientConfig : Define the namespace and name for the webhook Service within the cluster, along with the caBundle, which is the SSL/TLS certificate to secure the communication.
- Rules : Define when the webhook should be triggered. In this example, the rule applies to CREATE operations on pods resources within a specified namespace.
Custom Objects (Resources)
By default, Kubernetes provides many objects (resources). When you deploy an object, its information is automatically stored in ETCD. You can then list, scale, delete, and perform other actions on it. All these changes are reflected in the ETCD datastore and are managed and monitor by a Controller. In Kubernetes, a Controller is implemented in the Go programming language.
In Kubernetes, you’re not limited to the default objects (resources) provided by the system. You can create your own custom objects tailored for specific use cases. However, this isn't as simple as defining a standard .yml file with the object’s details. First, you need to inform Kubernetes that it should allow the creation of your custom object type.
This is done by creating a Custom Resource Definition (CRD). A CRD defines the schema and behavior of your custom resource within the cluster. Below, we'll walk through creating a CRD for a flight ticket service :
marijan$ cat flighttickets-crd.yaml

apiVersion: apiextensions.k8s.io/v1
kind: CustomResourceDefinition
metadata:
  name: flighttickets.flights.com
spec:
  scope: Namespaced
  group: flights.com
  names:
    kind: FlightTicket
    singular: flightticket
    plural: flighttickets
    shortNames:
      - ft
  versions:
    - name: v1
      served: true
      storage: true

      schema:
         openAPIV3Schema:
            type: object
            properties:
              spec:
                type: object
                properties:
                  from:
                    type: string
                  to:
                    type: string
                  number:
                    type: integer
                    minimum: 1
                    maximum: 10
- scope : Defines whether the object is Namespaced (scoped to a specific namespace) or Cluster-wide (available across all namespaces).
- group : Specifies the API group used for the object, here flights.com. This will be part of the API version (e.g., flights.com/v1).
- name : Provides metadata about the resource :
- kind : The kind of resource, here FlightTicket ;
- singular : Singular form of the resource name ;
- plural : Plural form (flighttickets), used in API requests ;
- shortNames : Optional shorthand to call the resource (e.g., ft).
- versions : Lists supported API Version.
- schema : Defines the structure of the resource using OpenAPI v3 Schema :
- properties : Specifies fields (from, to, number) and their data types.
Here’s how you can set up and use your custom object after creating the CRD :
marijan$ cat flight-ticket-pod.yaml

apiVersion: flights.com/v1
kind: FlightTicket
metadata:
  name: my-flight-ticket
spec:
  from: London
  to: Geneva
  number: 2
You can list all of api-ressources by running the following command :
marijan$ kubectl api-resources
You should be able to see your own CRD.
Custom Controllers
As explained earlier, information is automatically stored in ETCD. If you need to perform operations on this data, such as retrieving, deleting, listing, and more, a Controller must be set up. By default, for standard Kubernetes objects, a Controller is already provided. However, for your custom resources (CRDs), you need to create and configure your own Controller.
To do this, you will need to implement queuing and caching mechanisms. Even if you are proficient in Python, it is recommended to develop your Controller in Go. This is because Kubernetes provides a sample Controller in Go, which can be easily adapted for your purposes. Click here to visit the GitHub repository.
Once you have customised the code, you simply need to compile it into a Docker image and deploy it in a Pod.
Operator Framework
The Operator Framework combines CRDs and custom Controllers within a single deployment, eliminating the need to manage them as separate objects. This integration simplifies management by grouping them together.
However, this is just one of its many utilities. The Operator Framework offers a wide range of functionalities. For example, ETCD has its own Operator Framework, which is specifically designed to manage an ETCD cluster.
This framework includes an ETCDCluster CRD and an ETCD Controller. The Controller monitors the CRD to deploy and manage resources. Beyond basic operations, it can perform advanced tasks such as taking backups, restoring them, and more.
Many of these Operators are available on OperatorHub.io, covering a variety of services like Grafana, Argo, Prometheus, and others.
Resources Management
Resource management is ensured by the kube-scheduler, which is used to check how many resources a Pod requires. This service ensures the workload is balanced across worker nodes. For instance, if the resources on the first worker node are insufficient, it will automatically move the resources to the second node, where space is available.
However, if there is no sufficient space on any worker node, the scheduler will hold back the Pod, and you will get an error when you try to get information about the created Pod.
Requests and Limits
By default, when you run a new Pod without specifying the request and limit resources, it will automatically use the maximum resources available on the worker node.
To manage resources efficiently and ensure that your cluster is not overloaded by unnecessary processes that do not require many resources, you can define the request and limit resources for CPU and memory in the configuration file of a Pod.
Here is an example of a configuration file for a Pod with requests and limits for memory and CPU :
marijan$ cat pod-request-and-limit-defintion.yml

apiVersion: v1
kind: Pod
metadata:
    name: myapp-pod
    labels:
        app: myapp
        type: front-end
spec:
    containers:
        - name: nginx-container
          image: nginx
          resources:
            requests:
              memory: "1Gi"
              cpu: 1
            limits:
              memory: "2Gi"
              cpu: 2
Resource values can be expressed in different ways :
- CPU : It can be expressed as a simple number (e.g., 1 for 1 CPU) or in milliCPUs (e.g., 100m for 0.1 CPU) ;
- Memory : It can be expressed using suffixes like E, P, T, G, M, K, or Ei, Pi, Ti, Gi, Mi, Ki, or even as a complete number.
The requests and limits resources can be set directly in the Pod or for all Pods running in a namespace with the LimitRange. It's also possible to allocate a amount of resources for a namespace using ResourceQuota.
Exceed Limits
Even if you set limits on your Pod, it can still exceed these limits. This can not happen with CPU, as the system throttles CPU usage. However, the container can use more memory than was specified in the configuration.
When this happens and the Pod tries to consume more memory than allowed, the Pod will be terminated, and you will see the error "OOM (Out Of Memory)" in the logs.
Behavior
Here is an explanation of resource behavior in a worker node for memory and CPU :
- No requests / No limits : In the first scenario, neither requests no limits are set for the resources. As a result, Pods will compete for resources, potentially consuming all available resources and leaving no space for other Pods.
- No requests / Limits : In this scenario, only limits are set, so Pods cannot consume more resources than what is configured.
- Requests / Limits : In this scenario, both requests and limits are set. The Pod will receive at least the requested resources and cannot consume more than the specified limit.
- Requests / No limits : Requests are set, but limits are not. This scenario is the most recommended because if a Pod needs to consume more resources than initially requested, Kubernetes will ensure the requested resources are available for the second pod by reducing the consumption of other Pods.
Taints and Tolerations
By default, when you deploy a Pod, it will be automatically placed by the Scheduler on a Worker Node where space is available. However, if a specific taint is applied to a Worker Node, your Pod cannot be placed there or run unless it has the appropriate toleration.
As explained above, taints are applied to Nodes. You can assign a taint to a Node by running the following command :
marijan$ kubectl taint node <node-name> <key>=<value>:<taint-effect>
- Key : used as the identifier for the taint of the node ;
- Value : provides additional information about the key ;
- Taint : NoExecute, NoSchedule and PreferNoSchedule ;
Once the taint is applied, to configure the toleration on a Pod, add the following information under the spec section of the Pod's .yml file :
marijan$ cat pod-toleration-definition.yml

apiVersion: v1
kind: Pod
metadata:
    name: myapp-pod
    labels:
        app: myapp
        type: front-end
spec:
    containers:
        - name: nginx-container
          image: nginx
    tolerations:
        - key: <key>
          operator: Equal
          value: <value>
          effect: <taint-effect>
Careful! Just because a Pod has a toleration set does not mean it will automatically be placed on a specific node. It can still be placed anywhere. Node placement can be controlled using Node Affinity.
NoSchedule and PreferNoSchedule
The NoSchedule effect ensures that the Kubernetes Scheduler does not assign a Pod to a Node if the Pod does not have the appropriate toleration. If a Pod is already running on a Node before the taint is applied, it will not be deleted and will continue to run.
The PreferNoSchedule effect works on the same principle, however, the control plane will try to avoid placing a Pod on a Node that has a taint the Pod does not tolerate.
For instance, the Kube Master has a NoSchedule taint set on it, which you can see by running the following command :
marijan$ kubectl describe node <name-of-masternode> | grep Taint

Taints:             node-role.kubernetes.io/control-plane:NoSchedule
To remove a taint, you just have to copy the output of the taint, for example node-role.kubernetes.io/control-plane:NoSchedule above, and add a dash at the end :
marijan$ kubectl taint nodes <node> node-role.kubernetes.io/<node>:<effect>-

node/<node> untainted
NoExecute
The NoExecute taint is similar to NoSchedule in that a Pod without the appropriate toleration will not be placed on the node. However, if you set this taint on a node that already has multiple Pods running on it, and those Pods do not have the proper toleration, they will be automatically deleted.
Node Selectors
Imagine your Kubernetes cluster has three nodes: one with a lot of resources, a second that is somewhat smaller, and the last with very few available resources. You want to set up a Pod that requires a lot of resources and ensure it runs on the large node with many available resources.
To achieve this, you need to add a nodeSelector section to the Pod's .yml file, specifying the appropriate value :
marijan$ cat pod-nodeselector-definition.yml

apiVersion: v1
kind: Pod
metadata:
    name: myapp-pod
    labels:
        app: myapp
        type: front-end
spec:
    containers:
        - name: nginx-container
          image: nginx
    nodeSelector:
          size: large
However, the size of the nodes is not automatically defined. You need to manually add a label to your node. For example, below, I have defined a key named size with the value Large for my worker node. Then, you can use this information in your Pod configuration :
marijan$ kubectl label node <node> size:large
Node Affinity
In Node Selectors, you cannot provide advanced expressions. You are limited to specifying only the key and the value of the node when setting up a Pod.
However, with Node Affinity, you have the option to match expressions using different operators. Similar to Node Selectors, you need to define labels for the nodes beforehand.
Here's an example, the key is size, defined on the node, with the value small, indicating the smallest node in the cluster. The operator is NotIn, which means the Pod should not be placed inside this node :
apiVersion: v1
kind: Pod
metadata:
    name: myapp-pod
    labels:
        app: myapp
        type: front-end
spec:
    containers:
        - name: nginx-container
          image: nginx
    affinity:
      nodeAffinity:
        requiredDuringSchedulingIgnoredDuringExecution:
          nodeSelectorTerms:
          - matchExpressions:
            - key: size
              operator: NotIn
              values:
              - small
To achieve this, we have added an affinity section with four subsections. All of them are commonly used, except for one, the longest, which can vary depending on your specific needs :
- requiredDuringSchedulingIgnoredDuringExecution : This ensures that the pod is scheduled onto an appropriate node during initial scheduling. However, if the pod is already running on a node that is not appropriate, it will continue running there and ignore changes that would evict it.
- preferredDuringSchedulingIgnoredDuringExecution : This suggests a preference for scheduling the pod onto an appropriate node. If ideal conditions are not met (such as resource constraints), the pod can be scheduled onto a less ideal node. Similar to the previous option, if the pod is already running on an inappropriate node, it will remain there and not be evicted.
- requiredDuringSchedulingRequiredDuringExecution : This mandates that the pod is scheduled onto an appropriate node during initial scheduling. If the pod is running on an inappropriate node, it will be deleted from there and rescheduled onto the correct node to ensure compliance with the affinity rule.
Ensure Allocation
As previously mentioned, setting only taints and tolerations on nodes and pods does not guarantee that your pod will always be scheduled onto the correct node. It might still be scheduled onto a different node if conditions permit.
Similarly, setting up node affinity alone does not guarantee that a specific node will exclusively host a particular pod. Other pods can still be placed on that node by the scheduler.
The recommended approach to ensure your pods are scheduled onto the correct nodes and without having other pods running inside involves using a combination of both Taints and Tolerations along with Node Affinity.
Observation
This section is about status, logging and monitoring about Pods on Kubernetes.
Status
After deploying a Pod, it typically goes through three stages :
- Pending : The scheduler is looking for finding an appropriate node to schedule the Pod on.
- ContainerCreating : Kubernetes is pulling the necessary container images and setting up the environment ;
- Running : The Pod has successfully started, and its containers correctly are running.
You can check the current status of a Pod by executing the following command and looking at the STATUS column :
marijan$ kubectl get pods

NAME        READY   STATUS    RESTARTS   AGE
<pod>       1/1     Running   0          5m58s
Condition
The Status section provides a high-level overview of the Pod's health. For more detailed information, you can check the conditions of the Pod, which include :
- PodScheduled : Indicates whether the Pod has been scheduled on a node. It is set to True if scheduled, False otherwise ;
- Initialized : Indicates if the Pod's initialisation process is complete. It is set to True once the Pod has been fully initialized ;
- ContainersReady : This condition is set to True once all containers in the Pod are ready to run ;
- Ready : This condition is True when all other conditions are met, indicating the Pod is fully ready to serve traffic.
You can check the current condition of a Pod by executing the following command and looking under Conditions section :
marijan$ kubectl get pods

Containers:
...
Conditions:
  Type                        Status
  PodReadyToStartContainers   True
  Initialized                 True
  Ready                       True
  ContainersReady             True
  PodScheduled                True
Volumes:
...
Readiness Probes
As you can see, Kubernetes marks your Pod as Ready only after it has been scheduled, initialised, and its containers have been created.
However, some applications take more than a few seconds to become fully operational. In fact, they may require several minutes to be ready. To ensure that the application is fully ready before it starts receiving traffic, you can configure a Readiness Probe.
To ensure everything works properly, you can set up different tests, such as:
- HTTP : Perform an HTTP check to verify if the API is running ;
- TCP : Run a TCP test to check if a specific port is listening ;
- Script : Create and execute a custom script that exits successfully only when the application is fully running.
Here is an example of configuration file with HTTP check :
apiVersion: v1
kind: Pod
metadata:
    name: myapp
spec:
    containers:
    - name: webserver
      image: nginx
    readinessProbe:
        httpGet:
            path: /api/ready

        initialDelaySeconds: 10
        periodSeconds: 5
        failureThreshold: 8
In this case, we're checking if the application is working via an HTTP request. We've added additional settings, such as :
- initialDelaySeconds : The number of seconds to wait before making the first HTTP request ;
- periodSeconds : How often the HTTP request should be retried ;
- failureThreshold : The number of failed attempts before marking the Pod as failed.
For a TCP check, here is an example for verifying SQL connectivity :
    readinessProbe:
        tcpSocket:
            port: 3306
Finally, here is an example of a script-based check :
    readinessProbe:
        tcpSocket:
            port: 3306
Liveness Probes
The Readiness Probe ensures that traffic can be routed to a container, while the Liveness Probe ensures that the container is alive and running correctly.
The principle is the same for both probes; the same checks and settings are available. Here is an example of a configuration file with an HTTP check :
apiVersion: v1
kind: Pod
metadata:
    name: myapp
spec:
    containers:
    - name: webserver
      image: nginx
    livenessProbe:
        httpGet:
            path: /api/ready

        initialDelaySeconds: 10
        periodSeconds: 5
        failureThreshold: 8
In this case, we're checking if the application is working via an HTTP request. We've added additional settings, such as :
- initialDelaySeconds : The number of seconds to wait before making the first HTTP request ;
- periodSeconds : How often the HTTP request should be retried ;
- failureThreshold : The number of failed attempts before marking the Pod as failed.
For a TCP check, here is an example for verifying SQL connectivity :
    livenessProbe:
        tcpSocket:
            port: 3306
Finally, here is an example of a script-based check :
    livenessProbe:
        tcpSocket:
            port: 3306
Logging
By default, when you execute the following command with the -f parameter, it will display the logs from the Pod and update them in real time :
marijan$ kubectl logs -f <pod>
However, if there are multiple containers within the same Pod, you will need to specify the name of the container you want to monitor :
marijan$ kubectl logs -f <pod> <container>
Monitoring
To get Node-level metrics, such as the number of nodes in a cluster, their health status, and performance details (e.g., CPU, memory usage) or for Pod-level metrics, such as the number of running pods and their performance statistics, monitoring solutions can provide the necessary insights.
By default, Kubernetes does not offer a full-monitoring solution. However, there are many open-source and third-party tools available for monitoring Kubernetes environments, such as Prometheus, Elastic Stack, and Datadog, among others.
In the early days of Kubernetes, a service called Heapster was used as the default monitoring solution to collect cluster metrics. However, Heapster has since been deprecated and has been replaced by Metrics Server, which is now the standard tool for gathering basic resource metrics usage in Kubernetes clusters.
Metrics Server is an in-memory monitoring solution and does not store data on disk. As a result, it cannot retain performance history or generate statistics. To achieve this, you should use one of the advanced full-monitoring solutions listed above.
On each Node, it runs an agent called Kubelet, which is a agent responsible to receive information from the master and running Pod on the node.
On this agent, it exists an subcompenent called cAdvisor which is used to collect metrics about the Pod and expose it them to the Master. The Master will then send information to the Metrics Server.
In order to deploy the Metrics Server, follow the steps bellow :
1. First of all, apply the GitHub repository :
marijan$ kubectl apply -f https://github.com/kubernetes-sigs/metrics-server/releases/latest/download/components.yaml
2. Then, edit the .yaml configuration file and add the following informations :
marijan$ kubectl -n kube-system edit deploy metrics-server

...
      containers:
      - args:
        - --cert-dir=/tmp
        - --secure-port=4443
        - --kubelet-preferred-address-types=InternalIP,ExternalIP,Hostname
        - --kubelet-use-node-status-port
        - --metric-resolution=15s
        command:
        - /metrics-server
        - --kubelet-insecure-tls
        - --kubelet-preferred-address-types=InternalIP
...
- You should add only command part; They are only here to prevent error "Metrics API not available".
3. Finally, run the following command to get information about your nodes and Pods :
marijan$ kubectl top node
NAME        CPU(cores)   CPU%   MEMORY(bytes)   MEMORY%
deb-vm-01   193m         9%     1435Mi          76%
deb-vm-02   74m          3%     823Mi           44%

marijan$ kubectl top pod
NAME        CPU(cores)   MEMORY(bytes)
myapp-pod   0m           14Mi
Helm Fundamentals
To deploy a service like WordPress, you need to set up several Kubernetes objects: a Service object for networking, a Deployment for the WordPress image, a Secret to store the admin password, and PersistentVolume (PV) and PersistentVolumeClaim (PVC) objects to handle data storage.
While it may seem straightforward to deploy a separate .yaml file for each object, this approach can be time-consuming. Additionally, if you later want to update the service, you'll need to modify and manage each file individually.
To streamline this process, we can download or create our own Helm package. A Helm chart for WordPress, for instance, includes all the necessary objects (as mentioned above) required for the service to run correctly. This enables easy deployment, scaling, and upgrading of the service with minimal effort.
First, you need to install Helm. Here are the steps for Debian :
marijan$ curl https://baltocdn.com/helm/signing.asc | gpg --dearmor | sudo tee /usr/share/keyrings/helm.gpg > /dev/null
marijan$ sudo apt-get install apt-transport-https --yes
marijan$ echo "deb [arch=$(dpkg --print-architecture) signed-by=/usr/share/keyrings/helm.gpg] https://baltocdn.com/helm/stable/debian/ all main" | sudo tee /etc/apt/sources.list.d/helm-stable-debian.list
marijan$ apt-get update
marijan$ apt-get install helm
Repository
As Docker has its own package repository, and Debian uses DPKG, HELM also has its own repository. This repository allows you to find various packages and upload your own HELM charts for your application. It can be find here.
Helm enables direct searching of repositories from the command line, which queries Artifact Hub by default :
marijan$ helm search hub wordpress
URL                                                     CHART VERSION   APP VERSION             DESCRIPTION
https://artifacthub.io/packages/helm/kube-wordp...      0.1.0           1.1                     this is my wordpress package
https://artifacthub.io/packages/helm/wordpress-...      1.0.2           1.0.0                   A Helm chart for deploying Wordpress+Mariadb st...
https://artifacthub.io/packages/helm/bitnami/wo...      23.1.29         6.6.2                   WordPress is the world's most popular blogging ...
In addition to Artifact Hub, other Helm chart repositories, such as Bitnami, are also available :
marijan$ helm repo add bitnami https://charts.bitnami.com/bitnami
"bitnami" has been added to your repositories

marijan$ helm repo list
NAME         URL
bitnami      https://charts.bitnami.com/bitnami
To search for charts within the added repository, use the following command :
marijan$ helm search repo wordpress
NAME                    CHART VERSION   APP VERSION     DESCRIPTION
bitnami/wordpress       23.1.29         6.6.2           WordPress is the world's most popular blogging ...
Release
Now that Helm is installed, and we’ve defined the repository we’ll use, we can deploy a chart using the following steps:
marijan$ helm install release-1-wordpress bitnami/wordpress
This will install the package, and a file called values.yaml will be generated. This file contains all the configuration data for WordPress, allowing you to make any necessary modifications for your application. To modify a Helm chart, you can download and extract it :
marijan$ helm pull --untar bitnami/wordpress
If you need to upgrade, rollback, or uninstall the package, you simply need to run the helm command followed by the desired parameter and the name of your package. For example :
marijan$ helm rollback release-1-wordpress
Default Services
This section is about the Default Services in Kubernetes which are running in the cluster.
CoreDNS
By default, Kubernetes has an integrated DNS resolver which is used to identify each pod running inside of a namespace, into a worker node.
For instance, in the namespace Prod, we have a pod named Web Services. If you set up a web server, instead of inserting the IP address of the pod used as a SQL Server, you can just write down the name of the service, which is db-services in our case.
However, if you want to use a SQL server running on another worker node, you can also put only the name, but you have to add the following information :
marijan$ cat webservices.conf

..
mysql.connect("db-dev-services.dev.svc.cluster.local")
..
- cluster.local : This stands for the domain name of your cluster. By default, this value will be cluster.local ;
- svc : This means services, because here we are referring to a service ;
- dev : The name of the namespace where the pod is running ;
- db-dev-services : The name of the pod.

